 Back in 2013 i wrote a blog post with a very similar name, How To: Call Apex code from a Custom Button. It continues to gather a significant number of hits. Its a common task as its good to first consider extending the Salesforce UI’s before building your own. The Custom Button approach actually still works very well in Lightning Experience and still for now has some benefits. However Lightning Experience is increasingly offering more and more ways to be customised, Home Page, Record Detail and now Actions!
Visualforce and Standard Controllers have long since been the main stay for implementing Custom Buttons. However for any of those that have tried it, you’ll know that Visualforce pages need some work to adopt the new Lightning Design System style. So what if we could link a natively built and styled custom Lightning UI with a button?
Well in Winter’17 we can! Custom Buttons are out in the Lightning world, what are hip and trendy these days are Actions, as i mentioned in my Platform Action post, Actions are fast becoming the future! Or in this case Lightning Component Actions.
Force.com IDE and Lightning Components
 I have also used this as a chance to get familiar with the recently announce Force.com IDE Beta, which supports editing Lightning Components. It worked quite well, the wizard creates the basic files of a component include template controller and helper files.
The auto complete also worked quite well in the component editor. There is also quite a neat outline view. To create a design file (not actually needed here) i had to create this as a simple text file in Eclipse and be sure to name it after my component with .design on the end. After this the IDE seemed to pick it up just fine, though it found it does not save with the other component files as i would have expected.

Creating an Lightning Component Action
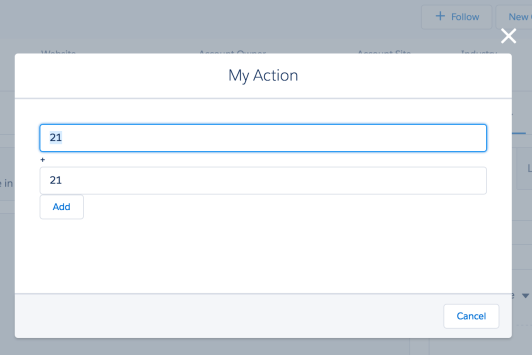
As with the Record, Tab and Home pages, a new interface, force:lightningQuickAction, has been added to the platform to indicate that your component supports Actions. I used the sample in the Salesforce documentation to get me started and it works quite well. The following is the component markup, i’ll cover the controller code later in this post.
<aura:component implements="force:lightningQuickAction">
<!-- Stupidly simple addition -->
<ui:inputNumber aura:id="num1"/> +
<ui:inputNumber aura:id="num2"/>
<ui:button label="Add" press="{!c.clickAdd}"/>
</aura:component>
What was not immediately apparent to me once i had uploaded the code, was that i still needed to create an Action under Setup for object i wanted my action to be associated with. I chose Account for this, the following shows the New Action page i completed. It automatically detected my Lightning Component, nice!

I then found My Action under the Layout Editor, which was also a little odd since i have become so used to finding my components in Lightning App Builder. I guess though the distinction is record level vs page level and hence the Layout Editor was chosen, plus existing actions are managed through layouts.

Once i updated the Layout, My Action then appeared under the actions drop down (as shown at the top of this blog). As you can see below the component is wrapped in a popup with a system provided Cancel button. I chose to use the force:lightningQuickAction interface as per the docs. The force:lightningQuickActionWithoutHeader hides the Header and Cancel button shown, though popup close X button is still shown.

The Component Controller code for the sample component shows how you can programatically close the popup and deliver a user message via the toast component. I enjoyed learning about this while I looked at this sample. Extra credit to the documentation author here!
({
clickAdd: function(component, event, helper) {

// Get the values from the form
var n1 = component.find("num1").get("v.value");
var n2 = component.find("num2").get("v.value");

// Display the total in a "toast" status message
var resultsToast = $A.get("e.force:showToast");
resultsToast.setParams({
"title": "Quick Add: " + n1 + " + " + n2,
"message": "The total is: " + (n1 + n2) + "."
});
resultsToast.fire();

// Close the action panel
var dismissActionPanel = $A.get("e.force:closeQuickAction");
dismissActionPanel.fire();
}
})
Firing the toast event created in the above sample looks like this…

Context is everything…
The force:hasRecordId interface can be used to determine which record the user is looking at. Simply add it to your component like so…
<aura:component
implements="force:lightningQuickAction,force:hasRecordId">
Record Id is {!v.recordId}
</aura:component>
Note: I have it on good authority, that contrary to some samples and articles the you do NOT need to define the recordId property via aura:attribute.
Summary
In short i am really getting quite excited by the amount of places Lightning Components are starting to popup in, not just more places within Lightning Experience, but Salesforce1 Mobile, Communities and even Lightning Outlook. Join me at my Dreamforce 2016 session where we will also be looking at Lightning Out: Components on any Platform, featuring Google App Addins.