Quantcast
Channel: Andy in the Cloud
Viewing all 119 articles
Browse latest View live

The new GitHub Deploy to Salesforce Button!

$
0
0

deployThe GitHub Salesforce Deployment tool has been one of my most successful tools to date, i’m really pleased with it and how well it has been adopted. You can read more about the inspiration and background to the tool in my original blog post here.

I recently received a very nice submission to improve the visuals of the tool when invoking it from a GitHub Readme file, in the form of the Deploy to Salesforce button image! Big thanks to Karanrajs for creating it, it looks great! I have now integrated it into the main repository and given repository owners a nice utility feature to copy and paste the required HTML markup to embed in their README files.

To use it go to the main page of the here tool, enter your details and click the Show GitHub README button code checkbox, then copy paste the code into your README file, i usually place under the title then sit back and enjoy!

Screen Shot 2014-09-27 at 12.18.18

For example the README file for the Apex Metadata API repository now looks like this…

Apex Wrapper Salesforce Metadata API
====================================

<a href="https://githubsfdeploy.herokuapp.com?owner=financialforcedev&repo=apex-mdapi">
  <img alt="Deploy to Salesforce"
       src="https://raw.githubusercontent.com/afawcett/githubsfdeploy/master/src/main/webapp/resources/img/deploy.png">
</a>

When displayed on the repository main page, we now see a shiny new button!

Screen Shot 2014-09-27 at 12.23.21


Calling Flow from Apex

$
0
0

Since Summer’14 it has been possible to invoke a Flow from Apex, through the oddly named Interview system class method start. This blog talks about using this as a means to provide an extensibility mechanism, as an alternative option to asking an Apex developer to implement an Apex interface you’ve exposed. Clicks not code plugins!

Prior to Summer’14 it was only possible to embed a Flow in a Visualforce page, using the the flow:interview component, as described here. But this of course required a UI and hence user interaction to drive it. What if you wanted to allow admins to extend or customise the flow of some Apex logic using Flow from a none UI context?

Enter trigger ready-flows, first introduced as part of the Summer’14 pilot for running Flow from Workflow, which itself is still in Pilot, thought the ability to create trigger ready-flows is now generally available, yipee! Here’s what the docs have to say about them…

You can also build trigger-ready flows. A trigger-ready flow is a flow that can be launched without user interaction, such as from a flow trigger workflow action or the Apex interview.start method. Because trigger-ready flows must be able to run in bulk and without user interaction, they can’t contain steps, screens, choices, or dynamic choices in the active flow version—or the latest flow version, if there’s no active version.

This blog will present the following three examples of calling trigger-ready flows from Apex.

  • Hello World, returning a text value set in a Flow
  • Calc, shows passing in values to a Flow and returning the result of some processing.
  • Record Updater, shows passing in some SObject records to the Flow for processing and returning them.

Hello World Example

Here is a simple example that invokes a Flow that just returns a string value defined within the Flow.

ReturnHelloWorldFlow

ReturnHelloWorldAssignment

The following Apex code calls the above Flow and outputs to the Debug log.

// Call the Flow
Map<String, Object> params = new Map<String, Object>();
Flow.Interview.ReturnHelloWorld helloWorldFlow = new Flow.Interview.ReturnHelloWorld(params);
helloWorldFlow.start();

// Obtain the results
String returnValue = (String) helloWorldFlow.getVariableValue('ReturnValue');
System.debug('Flow returned ' + returnValue);

This outputs the following to the Debug log…

11:18:02.684 (684085568)|USER_DEBUG|[13]|DEBUG|Flow returned Hello from the Flow World!

Calc Example

This example passes in a value, which is manipulated by the Flow and returned.

CalcFlow CalcFlowAssignment

The following code invokes this Flow, by passing the X and Y values in through the Map.

// Call the Flow
Map<String, Object> params = new Map<String, Object>();
params.put('X', 10);
params.put('Y', 5);
Flow.Interview.Calc calcFlow = new Flow.Interview.Calc(params);
calcFlow.start();

// Obtain the results
Double returnValue = (Double) calcFlow.getVariableValue('ReturnValue');
System.debug('Flow returned ' + returnValue);

This outputs the following to the Debug log…

12:09:55.190 (190275787)|USER_DEBUG|[24]|DEBUG|Flow returned 15.0

Record Updater Example

With the new SObject and SObject Collection types in Summer’14 we can also pass in SObject’s. For example to apply some custom defaulting logic before the records are processed and inserted by the Apex logic. The following simple Flow loops over the records passed in and sets the Description field.

RecordUpdaterFlowRecordUpdaterAssignment

This code constructs a list of Accounts, passes them to the Flow and retrieves the updated list after.

// List of records
List<Account> accounts = new List<Account>{
	new Account(Name = 'Account A'),
	new Account(Name = 'Account B') };

// Call the Flow
Map<String, Object> params = new Map<String, Object>();
params.put('Accounts', accounts);
Flow.Interview.RecordUpdater recordUpdaterFlow = new Flow.Interview.RecordUpdater(params);
recordUpdaterFlow.start();

// Obtain results
List<Account> updatedAccounts =
	(List<Account>) recordUpdaterFlow.getVariableValue('Accounts');
for(Account account : updatedAccounts)
	System.debug(account.Name + ' ' + account.Description);

The follow debug update shows the field values set by the Apex code and those by the Flow…

13:10:31.060 (60546122)|USER_DEBUG|[39]|DEBUG|Account A Description set by Flow
13:10:31.060 (60588163)|USER_DEBUG|[39]|DEBUG|Account B Description set by Flow

Summary

Calling Flows from Apex is quite powerful to provide more complex extensibility back into the hands of admins vs developers. Though depending on your type of solution is somewhat hampered by the lack of the ability to dynamically create a subscriber configured Flow. As such for now is really only useful for none packaged Apex code deployments in production environment, where the referenced Flow’s can be edited (managed packaged Flows cannot be edited).

Despite this, for custom Apex code deployments to production it is quite powerful as it allows tweaks to the behaviour of solutions to be made without needing a developer to go through Sandbox and redeployment etc. Of course your also putting a lot of confidence in the person defining the Flows as well, so use this combo wisely with your customers!

Upvote: I’ve raised an Idea here to allow Apex to Dynamically create Flow Interview instances, with this in place ISV and packaged applications can make more use of this facility to provide clicks not code extensibility to their packaged application logic.


Calling Salesforce API’s from Ant Script – Querying Records

$
0
0

Back in June last year i wrote a blog entitled Look ma, no hands!, its main focus was how to leverage the then new ability to install and uninstall packages via the Metadata API. However there was another goal, that is i wanted to invoke Salesforce API’s using only native Ant script and 100% Java based Apache Ant tasks, so no Java coding or native curl executable invocations. Making the resulting script platform neutral and easier to manage.

In this blog i’d like to talk a little bit more about how it was done and highlight the excellent <http> Ant task from Missing Link (so named since surprisingly Ant has yet to provide a core task for HTTP comms). In addition i wanted share how i was able to recently extend this approach. While working with one of FinancialForce.com‘s new up and coming DevOps team members Brad Slater (also see Object Model Tool).

The goal once again was keeping it 100% Ant, this time invoking the Salesforce REST API to perform queries.

 		<!-- Query -->
 		<runQuery 
 			sessionId="${sessionId}" 
 			serverUrl="${serverUrl}" 
 			queryResult="accounts"
 			query="SELECT Id, Name FROM Account LIMIT 1"/>

As before the new Ant tasks are defined in single XML file, ant-salesforce.xml, you can download the updated version with the new <query> task and easily <import> into your own Ant scripts.

Ant provides an excellent way to encapsulate complex script in components it calls Tasks. You can implement these in Java or Ant script itself, using the <macrodef> Ant task. The following shows how the Salesforce <login> task was built for last years blog. You can see both the <http> and <xmltask> tasks in action.

	<!-- Login into Salesforce and return the session Id and serverUrl -->
	<macrodef name="login">
		<attribute name="username" description="Salesforce user name."/>
		<attribute name="password" description="Salesforce password."/>
		<attribute name="serverurl" description="Server Url property."/>
		<attribute name="sessionId" description="Session Id property."/>
		<sequential>
			<!-- Obtain Session Id via Login SOAP service -->
		    <http url="https://login.salesforce.com/services/Soap/c/29.0" method="POST" failonunexpected="false" entityProperty="loginResponse" statusProperty="loginResponseStatus">
		    	<headers>
		    		<header name="Content-Type" value="text/xml"/>
		    		<header name="SOAPAction" value="login"/>
		    	</headers>
		    	<entity>
		    		<![CDATA[
				    	<env:Envelope xmlns:xsd='http://www.w3.org/2001/XMLSchema' xmlns:xsi='http://www.w3.org/2001/XMLSchema-instance' xmlns:env='http://schemas.xmlsoap.org/soap/envelope/'>
				    	    <env:Body>
				    	        <sf:login xmlns:sf='urn:enterprise.soap.sforce.com'>
				    	            <sf:username>@{username}</sf:username>
				    	            <sf:password>@{password}</sf:password>
				    	        </sf:login>
				    	    </env:Body>
				    	</env:Envelope>
		    		]]>
		    	</entity>
		    </http>
			<!-- Parse response -->
			<xmltask destbuffer="loginResponseBuffer">
				<insert path="/">${loginResponse}</insert>
			</xmltask>
			<if>
				<!-- Success? -->
				<equals arg1="${loginResponseStatus}" arg2="200"/>
				<then>
					<!-- Parse sessionId and serverUrl -->
					<xmltask sourcebuffer="loginResponseBuffer" failWithoutMatch="true">
						<copy path="/*[local-name()='Envelope']/*[local-name()='Body']/:loginResponse/:result/:sessionId/text()" property="@{sessionId}"/>
						<copy path="/*[local-name()='Envelope']/*[local-name()='Body']/:loginResponse/:result/:serverUrl/text()" property="@{serverUrl}"/>
					</xmltask>
				</then>
				<else>
					<!-- Parse login error message and fail build -->
					<xmltask sourcebuffer="loginResponseBuffer" failWithoutMatch="true">
						<copy path="/*[local-name()='Envelope']/*[local-name()='Body']/*[local-name()='Fault']/*[local-name()='faultstring']/text()" property="faultString"/>
					</xmltask>
					<fail message="${faultString}"/>
				</else>
			</if>
		</sequential>
	</macrodef>

The <query> Task further leverages the <http> task to make a call to the Salesforce REST API query end point.

	<!-- Provides access to the Salesforce REST API for a SOQL query -->
	<macrodef name="runQuery" description="Run database query">
		<attribute name="sessionId" description="Salesforce user name."/>
		<attribute name="serverUrl" description="Salesforce url."/>
		<attribute name="query" description="Salesforce password."/>
		<attribute name="queryResult" description="Query result property name"/>
		<sequential>
			<!-- Extract host/instance name from the serverUrl returned from the login response -->
			<propertyregex property="host"
              input="${serverUrl}"
              regexp="^((http[s]?|ftp):\/)?\/?([^:\/\s]+)((\/\w+)*\/)([\w\-\.]+[^#?\s]+)(.*)?(#[\w\-]+)?$"
              select="\3"
              casesensitive="false" />			
			<!-- Execute Apex via REST API /query resource -->
		    <http url="https://${host}/services/data/v29.0/query" method="GET" entityProperty="queryResultResponse" statusProperty="loginResponseStatus" printrequestheaders="false" printresponseheaders="false">
		    	<headers>
		    		<header name="Authorization" value="Bearer ${sessionId}"/>
		    	</headers>
		    	<query>
		    		<parameter name="q" value="@{query}"/>
		    	</query>
		    </http>		
		    <property name="@{queryResult}" value="${queryResultResponse}"/>
		</sequential>
	</macrodef>

When put together the two Tasks work very well together, allowing you to login and pass the resulting Session Id to the query  task, then parse the results according to your needs with a small peace of inline JavaScript to parse the resulting JSON. The user of these tasks is blissfully unaware of some of the more advanced Ant script approaches used to implement them, which is how things should be when providing good Ant tasks.

<project name="demo" basedir="." default="demo">

    <!-- Import login properties -->
    <property file="${basedir}/build.properties"/>    
    <!-- Import new Salesforce tasks -->
    <import file="${basedir}/lib/ant-salesforce.xml"/>
    
    <!-- Query task demo -->	
    <target name="demo">
    
    	<!-- Login -->
 		<login 
 			username="${sf.username}" 
 			password="${sf.password}" 
 			serverurl="serverUrl" 
 			sessionId="sessionId"/>
 			
 		<!-- Query -->
 		<runQuery 
 			sessionId="${sessionId}" 
 			serverUrl="${serverUrl}" 
 			queryResult="accounts"
 			query="SELECT Id, Name FROM Account LIMIT 1"/>
 		
 		<!-- Parse JSON result via JavaScript eval -->
 		<script language="javascript">
			var response = eval('('+project.getProperty('accounts')+')');
			project.setProperty('Name', response.records[0].Name);
			project.setProperty('Id', response.records[0].Id);
		</script>
		
		<!-- Dump results -->
		<echo message="Queried Account '${Name}' with Id ${Id}"/>
		
    </target>   
     
</project>

Here is a more complex example processing more than one record via an Ant marco for each record.

 		<!-- Query -->
 		<runQuery 
 			sessionId="${sessionId}" 
 			serverUrl="${serverUrl}" 
 			queryResult="accounts"
 			query="SELECT Id, Name FROM Account"/>

		<!-- Ant marco called for each Account retrieved -->
	    <macrodef name="echo.account">
	    	<attribute name="id"/>
	    	<attribute name="name"/>
	    	<sequential>
				<!-- Process for each account -->
		    	<echo message="Queried Account '@{name}' with Id @{id}"/>
	    	</sequential>		    	
	    </macrodef> 		
 		
 		<!-- Parse JSON result via JavaScript eval and call above Ant macro -->
 		<script language="javascript">
			var response = eval('('+project.getProperty('accounts')+')');
			for(var idx in response.records)
			{
				var processRecord = project.createTask("echo.account");
                processRecord.setDynamicAttribute("id", response.records[idx].Id);
                processRecord.setDynamicAttribute("name", response.records[idx].Name);
                processRecord.execute();
			}
		</script>

Ant is not just for build systems or developers, it can be used quite effectively for many automation tasks. You could create an Ant script that polls for certain activity in your Salesforce org and invokes some application or more complex process for example. Ant has a huge array of tasks and massive community support, its a good skills to learn for cross platform scripting and i’ve frankly found very little it can do these days.

So you may be wondering, why ever use a Java based Ant task or process again to implement your complex Ant and Salesforce integrations? Well…. you may still want to go down the Java coding route if your needs are more complex or if your not comfortable with Ant scripting. Indeed in the case above, the project morphed into something much more complex and we ended up in Java after all. As always choose your tools for the job according to time, resources, skills and complexity. Hopefully this blog has given you another option in your tool belt to consider!


Apex Metadata API Q&A

$
0
0

The Apex Metadata API has now been updated to reflect the Metadata API from Winter’15, which means a host of new component types, including the topic on everyones lips, Lightning! Though sadly, my demo around this will have to wait as I hit a platform issue i’ve sent to Salesforce Support to help me with.

This library continues to be incredibly popular, i can get between 1 to 4 questions a week asking how to accomplish certain goals, via my blog and/or issues raised on the GitHub repository. So I’m really pleased to continue to support it and keep it fresh! One day we will get native support for this, but until that day I’ll press on….

A lot of questions i get are around the Apex Metadata API, though almost all are really about using the Metadata API itself regardless of the calling language. So i thought i’d focus this blog on sharing some of the ways i’ve tackled unlocking the secrets of the mighty Metadata API. While the following tips and tricks are given in the context of Apex, some will work just fine in other languages consuming this API.

1. Do I have to download the Metadata API WSDL?

You don’t, just use the MetadataService.cls and its MetadataServiceTest.cls directly in your org. The point of this library is to avoid you having to go through the process of creating and manipulating the generated code from the Salesforce WSDL to Apex tool (the output of which is not directly useable). So unless you find i’m slacking and have not updated the library to the latest version of the platform, your good to go with the latest one in the repository!

2. How do I create X using the Metadata API?

The Apex Metadata API consists of many hundreds of classes within the MetadataService.cls file. Some represent top level Metadata components (items in your org), such as CustomObject, some are child components such as CustomField, others are simply class types referenced by these. Knowing which is which is important to know where to start, as only those classes that represent Metadata components can be used with the CRUD operations.

The easiest way to determine this is to first open the Metadata API documentation and look at the list of components here. The documentation also has a really good topic on how to spot the fact that classes will extend Metadata, if so they represent Metadata component classes you can use with the CRUD operations. As the topic suggests, despite the library having already used the WSDL, it is still worth downloading for reference purposes. While I try to make the Apex code match this extension concept it may not always be possible (Folders are a current gap).

So for example we see that Layout looks like this in the WSDL….

<xsd:complexType name="Layout">
    <xsd:complexContent>
        <xsd:extension base="tns:Metadata">
            <xsd:sequence>
                <xsd:element name="customButtons" minOccurs="0" maxOccurs="unbounded" type="xsd:string"/>
                <xsd:element name="customConsoleComponents" minOccurs="0" type="tns:CustomConsoleComponents"/>
                <xsd:element name="emailDefault" minOccurs="0" type="xsd:boolean"/>
                <xsd:element name="excludeButtons" minOccurs="0" maxOccurs="unbounded" type="xsd:string"/>
                <xsd:element name="feedLayout" minOccurs="0" type="tns:FeedLayout"/>
                <xsd:element name="headers" minOccurs="0" maxOccurs="unbounded" type="tns:LayoutHeader"/>
                <xsd:element name="layoutSections" minOccurs="0" maxOccurs="unbounded" type="tns:LayoutSection"/>
                <xsd:element name="miniLayout" minOccurs="0" type="tns:MiniLayout"/>
                <xsd:element name="multilineLayoutFields" minOccurs="0" maxOccurs="unbounded" type="xsd:string"/>
                <xsd:element name="quickActionList" minOccurs="0" type="tns:QuickActionList"/>
                <xsd:element name="relatedContent" minOccurs="0" type="tns:RelatedContent"/>
                <xsd:element name="relatedLists" minOccurs="0" maxOccurs="unbounded" type="tns:RelatedListItem"/>
                <xsd:element name="relatedObjects" minOccurs="0" maxOccurs="unbounded" type="xsd:string"/>
                <xsd:element name="runAssignmentRulesDefault" minOccurs="0" type="xsd:boolean"/>
                <xsd:element name="showEmailCheckbox" minOccurs="0" type="xsd:boolean"/>
                <xsd:element name="showHighlightsPanel" minOccurs="0" type="xsd:boolean"/>
                <xsd:element name="showInteractionLogPanel" minOccurs="0" type="xsd:boolean"/>
                <xsd:element name="showKnowledgeComponent" minOccurs="0" type="xsd:boolean"/>
                <xsd:element name="showRunAssignmentRulesCheckbox" minOccurs="0" type="xsd:boolean"/>
                <xsd:element name="showSolutionSection" minOccurs="0" type="xsd:boolean"/>
                <xsd:element name="showSubmitAndAttachButton" minOccurs="0" type="xsd:boolean"/>
                <xsd:element name="summaryLayout" minOccurs="0" type="tns:SummaryLayout"/>
            </xsd:sequence>
        </xsd:extension>
    </xsd:complexContent>
</xsd:complexType>

And looks like this in MetadataService.cls…

    public class Layout extends Metadata {
        public String type = 'Layout';
        public String fullName;
        public String[] customButtons;
        public MetadataService.CustomConsoleComponents customConsoleComponents;
        public Boolean emailDefault;
        public String[] excludeButtons;
        public MetadataService.FeedLayout feedLayout;
        public String[] headers;
        public MetadataService.LayoutSection[] layoutSections;
        public MetadataService.MiniLayout miniLayout;
        public String[] multilineLayoutFields;
        public MetadataService.QuickActionList quickActionList;
        public MetadataService.RelatedContent relatedContent;
        public MetadataService.RelatedListItem[] relatedLists;
        public String[] relatedObjects;
        public Boolean runAssignmentRulesDefault;
        public Boolean showEmailCheckbox;
        public Boolean showHighlightsPanel;
        public Boolean showInteractionLogPanel;
        public Boolean showKnowledgeComponent;
        public Boolean showRunAssignmentRulesCheckbox;
        public Boolean showSolutionSection;
        public Boolean showSubmitAndAttachButton;
        public MetadataService.SummaryLayout summaryLayout;
    }

Next find the page for this Metadata type in the Metadata API documentation, in this case Layout is here. Force.com is a complex platform at times, and the number of fields can be quite bewildering. So what i usual do is one or both of the following tricks.

Firstly, when you scroll down to the bottom of the documentation topics, there is usually an example of the component in XML form. Secondly I sometimes use my favourite tool, Force.com or MavensMate to download the component in file form from my org to generate my own example, useful if the documentation example is to basic for your needs. Basically the XML form in either case, matches exactly the data structures and values you need to provide in Apex.

For example the Layout example looks like this…

<Layout xmlns="http://soap.sforce.com/2006/04/metadata">
    <layoutSections>
        <editHeading>true</editHeading>
        <label>System Information</label>
        <layoutColumns>
            <layoutItems>
                <behavior>Readonly</behavior>
                <field>CreatedById</field>
            </layoutItems>
            <layoutItems>
                <behavior>Required</behavior>
                <field>Name</field>
            </layoutItems>
        </layoutColumns>
        <layoutColumns>
            <layoutItems>
                <behavior>Readonly</behavior>
                <field>LastModifiedById</field>
            </layoutItems>
        </layoutColumns>
        <style>TwoColumnsTopToBottom</style>
    </layoutSections>
    <summaryLayout>
        <masterLabel>Great Name</masterLabel>
        <sizeX>4</sizeX>
        <sizeY>2</sizeY>
        <summaryLayoutItems>
            <posX>0</posX>
            <posY>0</posY>
            <field>Name</field>
        </summaryLayoutItems>
    </summaryLayout>
</Layout>

Note you will need to set the fullName field as well, to understand how to format this for your Metadata component refer to the following Q&A items for more discussion. The equivalent Apex code would look like this…

		MetadataService.Layout layout = new MetadataService.Layout();
		layout.fullName = 'Test__c-My Layout';
		layout.layoutSections = new List<MetadataService.LayoutSection>();
		MetadataService.LayoutSection layoutSection = new MetadataService.LayoutSection();
		layoutSection.editHeading = true;
		layoutSection.label = 'System Information';
		layoutSection.style = 'TwoColumnsTopToBottom';
		layoutSection.layoutColumns = new List<MetadataService.LayoutColumn>();
		MetadataService.LayoutColumn layoutColumn = new MetadataService.LayoutColumn();
		layoutColumn.layoutItems = new List<MetadataService.LayoutItem>();
		MetadataService.LayoutItem layoutItem1 = new MetadataService.LayoutItem();
		layoutItem1.behavior = 'Readonly';
		layoutItem1.field = 'CreatedById';
		layoutColumn.layoutItems.add(layoutItem1);
		MetadataService.LayoutItem layoutItem2 = new MetadataService.LayoutItem();
		layoutItem2.behavior = 'Required';
		layoutItem2.field = 'Name';
		layoutColumn.layoutItems.add(layoutItem2);
		layoutSection.layoutColumns.add(layoutColumn);
		layout.layoutSections.add(layoutSection);
		layout.summaryLayout = new MetadataService.SummaryLayout();
		layout.summaryLayout.masterLabel = 'Great name';
		layout.summaryLayout.sizeX = 4;
		layout.summaryLayout.sizeY = 2;
		layout.summaryLayout.summaryLayoutStyle = 'Default';
		layout.summaryLayout.summaryLayoutItems = new List<MetadataService.SummaryLayoutItem>();
		MetadataService.SummaryLayoutItem summaryLayoutItem = new MetadataService.SummaryLayoutItem();
		summaryLayoutItem.posX = 0;
		summaryLayoutItem.posY = 0;
		summaryLayoutItem.field = 'Name';
		layout.summaryLayout.summaryLayoutItems.add(summaryLayoutItem);
		List<MetadataService.SaveResult> results =
			service.createMetadata(
				new MetadataService.Metadata[] { layout });

Note that this is a complex class with many other class types needed to expressed sections etc for the layout. All of these classes will be in the MetadataService.cls class as inner classes. Have this file open as you work your way through mapping the XML structure to the Apex one, so that you can see the field names and their Apex class types. Alternatively you can also have the WSDL open, as the names of the schema types will also match those in Apex.

3. How do I update X using the Metadata API?

Unlike records, you don’t always have to have read the Metadata component in order to update it. Nor do have to complete all the fields, just the ones you want to update. For example the following will update the labels on a Custom Object, but will not for example result in the Description, Custom Help  or other Custom Object information being cleared just because you didn’t set them. Quite handy!

MetadataService.CustomObject customObject = new MetadataService.CustomObject();
customObject.fullName = 'Test__c';
customObject.pluralLabel = 'Update Labels';
customObject.nameField = new MetadataService.CustomField();
customObject.nameField.type_x = 'Text';
customObject.nameField.label = 'Test Record Upsert';
customObject.deploymentStatus = 'Deployed';
customObject.sharingModel = 'ReadWrite';
List<MetadataService.UpsertResult> results =
  service.upsertMetadata(
    new MetadataService.Metadata[] { customObject });

As always though, there are some exceptions to this rule, which are sadly not documented. Fortunately if you’ve not set certain fields required for an update (and some don’t often make sense) the API is pretty good at telling you which ones you need. At this point however your probably going to want to know what the existing field values are, thus you will need to read the Metadata component, set the fields your wanting to update and then update it. You will of course want read a Metadata component if you want to add to a list of things, such as a PickList.

// Read Custom Field
MetadataService.CustomField customField =
  (MetadataService.CustomField) service.readMetadata('CustomField',
     new String[] { 'Lead.picklist__c' }).getRecords()[0];

// Add pick list values
metadataservice.PicklistValue two = new metadataservice.PicklistValue();
two.fullName= 'second';
two.default_x=false;
metadataservice.PicklistValue three = new metadataservice.PicklistValue();
three.fullName= 'third';
three.default_x=false;
customField.picklist.picklistValues.add(two);
customField.picklist.picklistValues.add(three);

// Update Custom Field
handleSaveResults(
   service.updateMetadata(
      new MetadataService.Metadata[] { customField })[0]);

4. How do I know the Full Name of the Metadata Component?

Metadata components are not referenced using Id’s, they use their Full Name. This can be a little tricky to track down sometimes, especially when it is a component such as a Layout that arrived in the org via a managed package, which means the Full Name will likely need to include the applicable namespace qualification, in some cases more than once!

The first thing i do is use the Developer Workbench to confirm the Full Name.

DeveloperWorkbench-FullName

MetadataService.Report report =
   (MetadataService.Report) service.readMetadata('Report',
      new String[] { 'MyFolder/MyReport' }).getRecords()[0];

As one of the users of the API found out, this can sometimes not give you an accurate result however. So the one known gotcha being Layouts, where the Full Name needs to be qualified twice with the Namespace. For example to retrieve a Layout installed with my DLRS managed package the following code would be required.

Note the dlrs namespace prefix is applied to both the Custom Object name portion of the Layout name, as well as the Layout name itself. In this case i still used the Developer Workbench approach above to get most of the name, then applied this now known adjustment to get it to work. The follow reads a packaged layout.

MetadataService.Layout layout =
   (MetadataService.Layout) service.readMetadata('Layout',
      new String[] { 'dlrs__LookupRollupSummaryLog__c-dlrs__Lookup Rollup Summary Log Layout' }).getRecords()[0];

5. Why does readMetadata not thrown an exception?

The previous examples have been using the readMetadata operation. This operation will not throw any exception if any of the full names given to it are invalid (as in the custom object does not exist). Instead empty records will be returned. For example the following illustrates that even with an invalid custom object Full Name a Metadata record is still returned, but the Full Name is null. So the advice here is to check the FullName for being none null before you trust the contents of information returned from readMetadata…

MetadataService.CustomObject customObject =
   (MetadataService.CustomObject) service.readMetadata('CustomObject',
      new String[] { 'DoesNotExist__c' }).getRecords()[0];
System.assertEquals(customObject.FullName, null);

6. Error ‘x’ is not a valid value for the enum ‘y’

While the Metadata API WSDL does contain a list of valid values for fields, the generated Apex code does not result in Enum’s being created for them sadly. As such you have to know the correct String value to set. This can often be determined from the documentation of course (though i have found a few typos in the docs in the past). So if your still struggling, check the WSDL enumeration to confirm you’ve got the correct value.

For example in the WSDL…

<xsd:complexType name="WebLink">
    <xsd:complexContent>
        <xsd:extension base="tns:Metadata">
            <xsd:sequence>
                ...
                <xsd:element name="displayType" type="tns:WebLinkDisplayType"/>
                ...
            </xsd:sequence>
        </xsd:extension>
    </xsd:complexContent>
</xsd:complexType>
<xsd:simpleType name="WebLinkDisplayType">
    <xsd:restriction base="xsd:string">
        <xsd:enumeration value="link"/>
        <xsd:enumeration value="button"/>
        <xsd:enumeration value="massActionButton"/>
    </xsd:restriction>
</xsd:simpleType>

Then in Apex code…

MetadataService.WebLink webLink = new MetadataService.WebLink();
webLink.fullName = 'Test__c.googleButton';
webLink.availability = 'online';
webLink.displayType = 'button';

7. How can I create or update Apex code?

The only way to create or update an Apex class or Trigger is to use the deploy operation, take a look at the Deploy demo in the library here for more information. I have also used this approach in my DLRS tool here. You can also use the Tooling API if you desire, however this only works in DE orgs, it cannot be used in a Production org. Currently the only way i know to create an Apex class or Trigger in Production is to use the deploy operation.

8. Retrieving Profile or Permission Set Information

You can retrieve a PermissionSet using the readMetadata as follows…

MetadataService.MetadataPort service = createService();
MetadataService.PermissionSet ps = (MetadataService.PermissionSet)
  service.readMetadata('PermissionSet', new String[] { 'Test' }).getRecords()[0];

The following code reads the Administrator Profile.

MetadataService.MetadataPort service = createService();
MetadataService.Profile admin = (MetadataService.Profile)
  service.readMetadata('Profile', new String[] { 'Admin' }).getRecords()[0];

Finally, also worth considering if your querying only, is that you can use SOQL to query the Permission Set objects directly, scroll down to the bottom of this topic to see the object model diagram.

Summary

I hope these will help future Metadata API coders with some of the more obscure behaviours and tasks they need to perform. You can also read more about the Metadata API operations here. If you’ve read all this and still find yourself scratching your head please feel free to raise an issue on the GitHub repository here and I’ll try to help!


Mocking SOQL sub-select query results

$
0
0

If your a fan of TDD you’ll hopefully have been following FinancialForce.com‘s latest open source contribution to the Salesforce community, known as ApexMocks. Providing a fantastic framework for writing true unit tests in Apex. Allowing you to implement mock implementations of classes used by the code your testing.

The ability to construct data structures returned by mock methods is critical. If its a method performing a SOQL query, there has been an elusive challenge in the area of queries containing sub-selects. Take a look at the following test which inserts and then queries records from the database.

	@IsTest
	private static void testWithDb()
	{
		// Create records
		Account acct = new Account(
			Name = 'Master #1');
		insert acct;
		List<Contact> contacts = new List<Contact> {
			new Contact (
				FirstName = 'Child',
				LastName = '#1',
				AccountId = acct.Id),
			new Contact (
				FirstName = 'Child',
				LastName = '#2',
				AccountId = acct.Id) };
		insert contacts;

		// Query records
		List<Account> accounts =
			[select Id, Name,
				(select Id, FirstName, LastName, AccountId from Contacts) from Account];

		// Assert result set
		assertRecords(acct.Id, contacts[0].Id, contacts[1].Id, accounts);
	}

	private static void assertRecords(Id parentId, Id childId1, Id childId2, List<Account> masters)
	{
		System.assertEquals(Account.SObjectType, masters.getSObjectType());
		System.assertEquals(Account.SObjectType, masters[0].getSObjectType());
		System.assertEquals(1, masters.size());
		System.assertEquals(parentId, masters[0].Id);
		System.assertEquals('Master #1', masters[0].Name);
		System.assertEquals(2, masters[0].Contacts.size());
		System.assertEquals(childId1, masters[0].Contacts[0].Id);
		System.assertEquals(parentId, masters[0].Contacts[0].AccountId);
		System.assertEquals('Child', masters[0].Contacts[0].FirstName);
		System.assertEquals('#1', masters[0].Contacts[0].LastName);
		System.assertEquals(childId2, masters[0].Contacts[1].Id);
		System.assertEquals(parentId, masters[0].Contacts[1].AccountId);
		System.assertEquals('Child', masters[0].Contacts[1].FirstName);
		System.assertEquals('#2', masters[0].Contacts[1].LastName);
	}

Now you may think you can mock the results of this query by simply constructing the required records in memory, but you’d be wrong! The following code fails to compile with a ‘Field is not writeable: Contacts‘ error on line 16.

		// Create records in memory
		Account acct = new Account(
			Id = Mock.Id.generate(Account.SObjectType),
			Name = 'Master #1');
		List<Contact> contacts = new List<Contact> {
			new Contact (
				Id = Mock.Id.generate(Contact.SObjectType),
				FirstName = 'Child',
				LastName = '#1',
				AccountId = acct.Id),
			new Contact (
				Id = Mock.Id.generate(Contact.SObjectType),
				FirstName = 'Child',
				LastName = '#2',
				AccountId = acct.Id) };
		acct.Contacts = contacts;

While Salesforce have gradually opened up write access to previously read only fields, the most famous of which being Id, they have yet to enable the ability to set the value of a child relationship field. Paul Hardaker contacted me recently to ask if this problem had been resolved, as he had the very need described above. Using his ApexMock’s framework he wanted to mock the return value of a Selector class method that makes a SOQL query with a sub-select.

Driven by an early workaround (I believe Chris Peterson found) to the now historic inability to write to the Id field. I started to think about using the same approach to stich together parent and child records using the JSON serialiser and derserializer. Brace yourself though, because its not ideal, but it does work! And i’ve managed to wrap it in a helper method that can easily be adapted or swept out if a better solution presents itself.

	@IsTest
	private static void testWithoutDb()
	{
		// Create records in memory
		Account acct = new Account(
			Id = Mock.Id.generate(Account.SObjectType),
			Name = 'Master #1');
		List<Contact> contacts = new List<Contact> {
			new Contact (
				Id = Mock.Id.generate(Contact.SObjectType),
				FirstName = 'Child',
				LastName = '#1',
				AccountId = acct.Id),
			new Contact (
				Id = Mock.Id.generate(Contact.SObjectType),
				FirstName = 'Child',
				LastName = '#2',
				AccountId = acct.Id) };

		// Mock query records
		List<Account> accounts = (List<Account>)
			Mock.makeRelationship(
				List<Account>.class,
				new List<Account> { acct },
				Contact.AccountId,
				new List<List<Contact>> { contacts });			

		// Assert result set
		assertRecords(acct.Id, contacts[0].Id, contacts[1].Id, accounts);
	}

NOTE: Credit should also go to Paul Hardaker for the Mock.Id.generate method implementation.

The Mock class is provided with this blog as a Gist but i suspect will find its way into the ApexMocks at some point. The secret of this method is that it leverages the fact that we can in a supported way expect the platform to deserialise into memory the following JSON representation of the very database query result we want to mock.

[
    {
        "attributes": {
            "type": "Account",
            "url": "/services/data/v32.0/sobjects/Account/001G000001ipFLBIA2"
        },
        "Id": "001G000001ipFLBIA2",
        "Name": "Master #1",
        "Contacts": {
            "totalSize": 2,
            "done": true,
            "records": [
                {
                    "attributes": {
                        "type": "Contact",
                        "url": "/services/data/v32.0/sobjects/Contact/003G0000027O1UYIA0"
                    },
                    "Id": "003G0000027O1UYIA0",
                    "FirstName": "Child",
                    "LastName": "#1",
                    "AccountId": "001G000001ipFLBIA2"
                },
                {
                    "attributes": {
                        "type": "Contact",
                        "url": "/services/data/v32.0/sobjects/Contact/003G0000027O1UZIA0"
                    },
                    "Id": "003G0000027O1UZIA0",
                    "FirstName": "Child",
                    "LastName": "#2",
                    "AccountId": "001G000001ipFLBIA2"
                }
            ]
        }
    }
]

The Mock.makeRelationship method turns the parent and child lists into JSON and goes through some rather funky code i’m quite proud off, to splice the two together, before serialising it back into an SObject list and vola! It currently only supports a single sub-select, but can easily be extended to support more. Regardless if you use ApexMocks or not (though you really should try it), i hope this helps you write a few more unit tests than you’ve previous been able.


Permission Sets and Packaging

$
0
0

Permission Sets have been giving me and an unlucky few who are unable to install my Declarative Rollup Summary Tool some headaches since i introduced them. Thankfully I’ve recently discovered why and thought it worth sharing along with some other best practices i have adopted around packaging permission sets since…

Package install failures due to Permission Sets

After including Permission Sets in my package, I found that some users where failing to install the package, they received via email, the following type of error (numbers in brackets tended to differ).

Your requested install failed. Please try this again.
None of the data or setup information in your salesforce.com organization should have been 
 affected by this error.
If this error persists, contact salesforce.com Support through your normal channels
 and reference number: 604940119-57161 (929381962)

It was frustrating that i could not help them decode this message, it required them to raise a Salesforce support case and pass their org ID and error codes on the case. For those that did this, it became apparent after several instances, a theme was developing, a package platform feature dependency!

Normally such things surface in the install UI for the user to review and resolve. Dependencies also appear when you click the View Dependencies button prior to uploading your package. However it seems that Salesforce is currently not quite so smart in the area of Permission Sets and dependency management, as these are hidden from both!

Basically i had inadvertently packaged dependencies to features like Ideas and Streaming API via including my Permission Sets, one of which i had chosen to enable the Author Apex permission. This system permission seems to enable a lot of other permissions as well as enabling other object permissions (including optional features like Ideas, which happened to be enabled in my packaging org). Then during package install if for historic reasons the subscriber org didn’t have these features enabled the rather unhelpful error above occurs!

Scrubbing my Permission Sets

I decided enough was enough and wanted to eradicate any Salesforce standard permission from my packaged Permission Sets. This was harder than i thought, since simply editing the .permissionset file and uploading it didn’t not remove anything (this approach is only suitable for changing or adding permissions within a permission set).

Next having removed entries from the .permissionset file, i went into the Permission Set UI within the packaging org and set about un-ticking everything not related to my objects, classes and pages. This soon became quite an undertaking and i wanted to be sure. I then recalled that Permission Sets are cool because they have an Object API!

I started to use the following queries in the Developer Console to view and delete on mass anything i didn’t want, now i was sure i had removed any traces of any potentially dangerous and hidden dependencies that would block my package installs. I obtained the Permission Set ID below from the URL when browsing it in the UI.

select Id, SobjectType, PermissionsCreate, PermissionsEdit, PermissionsDelete, PermissionsRead
  from ObjectPermissions where ParentId = '0PSb0000000HT5A'
select Id, SobjectType, Field
  from FieldPermissions where ParentId = '0PSb0000000HT5A'

CheckObjectPermissions

Note that System Permissions (such as Author Apex) which are shown in the UI, currently don’t have an Object API, so you cannot validate them via SOQL. However at least these are listed on a single page so are easier to check visually.

Lessons learned so far…

So here are a few lessons i’ve learned to date around using Permission Sets…

  • Don’t enable System Permissions unless your 100% sure what other permissions they enable!
  • When editing your .permissionset files don’t assume entries you remove will be removed from the org.
  • Use SOQL to query your Permission Sets to check they are exactly what you want before uploading your package
  • Don’t make your Permission Sets based on a specific User License type (this is covered in the Salesforce docs but i thought worth a reminder here as it cannot be undone).
  • Do design your Permission Sets based on feature and function and not based on user roles (which are less likely to match your perception of the role from one subscriber to another). Doing the former will reduce the chances of admins cloning your Permission Sets and loosing out on them being upgraded in the future as your package evolves.

Introducing the LittleBits Connector for Salesforce

$
0
0

As those of you know that follow my brickinthecloud.com blog, i love using API’s in the cloud to connect not only applications, but devices. Salesforce themselves also share this passion, just take a look at their Internet of Things page to see how it can improve your business and the work Reid Carlberg is doing.

LittleBitsWithEV3When Salesforce sent me a LittleBits Cloud Starter Kit as Christmas present i once again set about connecting it to my favourite cloud platform! This blog introduces two new GitHub repos and a brand new installable package to allow you to take full advantage of the snap-not-solder that LittleBits electronics brings with the Salesforce clicks-not-code design model! So if your not an electronics whiz or coder, you really don’t have any excuses for not getting involved! LittleBits provides over 60 snap together components, to build automated fish feeders, to home security systems and practically anything else you can imagine!

cloud_diagram2The heart of the kit is a small computer module, powered by a USB cable (i plugged mine into my external phone battery pack!). It boots from an SD card and uses an onboard USB Wifi adapter to connect itself to the internet (once you’ve connected it to your wifi). After that you send commands to connected outputs to it via a mobile site or set of LittleBits Cloud API’s provided. So far i have focused on sending commands to the outputs (in my case i connected the servo motor), however as i write this i’m teaming up with Cory Cowgill who has also starting working with his kit from an inputs perspective (e.g. pressing on a button on the device).

Everyone in the Salesforce MVP community was lucky enough to get one of these kits and i wanted to make sure everyone could experience it with the cloud platform we love so much! Sadly right now the clicks-not-code solution IFTTT  (If-This-Then-That) used for controlling LittleBits devices does not fully support Salesforce (there is only a Salesforce Chatter plugin). Borrowing an approach i’ve been using for my Declarative Rollup Summary Tool, i set about building a declarative based tool that would allow the Salesforce admin to connect updates to any standard or custom object record to a LittleBits device!

The result is the LittleBits Connector!

LittleBitsTrigger

Once you have assembled and connected your LittleBits device, go to the Settings page under LittleBits Cloud Control and take note of your Access Token and Device ID. As you can see in the screenshot above enter these in the LittleBits Device section or in the LittleBits API custom setting.

The Trigger section needs only the Record ID of the record you want to monitor and have your device respond to when changes are made. Simply list the field API names (separated by a comma) of those you want the tool to monitor. Next fill in the LittleBits Output section with either literal values (on the left) and/or dynamic values driven by values from the record itself. This gives you quite a lot of flexibility to use Formula Fields for example to calculate the percentage.

Controlling a LittleBits cloud device is quite simple, define the duration of the output (how long to apply a voltage) and the amount of voltage as a percentage. Depending on the output module you’ve fitted, light or motor, the effects differ but the principle is the same. In the motor case, i set mine to Turn mode (see below). Then by applying a duration of 100,000 and a percent the motor turns to a specific point each time. Making it ideal for building pointing devices!

With the help of my wifes crafting skills we set about on a joint Christmas project to build a pointing device that would show the Probability of a given Opportunity in realtime. Though the tool I ended up building can effectively be used with any standard or custom object. I also wanted to use only the modules in the LittleBits Cloud Start Kit. So with Salesforce Org and the tool the Internet of Things is in your hands!

Here is a video of our creation in action…

If you want to have a go yourself follow these steps…

Building your own Opportunity Probability Indicator Device #clicksnotcode

If clicks are more your thing than coding, fear not and follow these simple steps!

  1. Purchase a LittleBits Cloud Connector and follow the onscreen instructions once you have created your LittleBits account here. Complete the tutorial to confirm its connected.
  2. Build the device modules configuration as shown in the picture below. On the servo module, there is a tiny switch, use the small screw driver provided to push it to the down position, to put the servo in “turn” mode.
    LittleBitsDevice
  3. Next the fun bit, construct your pointing device! I’d love to see tweets of everyones crafting skills!
    pointingdevice
  4. Install the latest LittleBits Connector either via clicking the package install links or as code, see GitHub README. The first time you go to the LittleBits Trigger tab, you maybe asked to complete the post install step to configure the Metadata API needed by the tool to deploy the Apex Triggers, complete this step as instructed on screen.
  5. Click New on the LittleBits Trigger tab, complete the LittleBits Trigger record as described above, but of course using a record Id from an Opportunity record in your org then click Save.
  6. Click the Manage Object Trigger button to automatically deploy a small Apex Trigger to pass on updates made to the records to the LittleBits Connector engine.
  7. In Salesforce or Salesforce1 Mobile for that matter, update your Opportunity Stage (which updates the Probability). This results in an Apex Job which typically fires fairly promptly and you should see your device respond! If you don’t see anything change on your device confirm its working via the LittleBits Cloud Control test page, next go to the Setup menu check the jobs are completing without error via the Apex Jobs page.

Using the LittleBits Cloud API from Apex

The above tool was built around an Apex wrapper i have started to build around the LittleBits Cloud API, which is a REST API. With a little more time and help from fellow LittleBits fan Cory, we will update it to support not only controlling devices, but also allow them to feedback to Salesforce. In the meantime if you want to code your own solution directly you can install the library here.

The code is quite simply for now, you can read more about it in the README file.

new LittleBits().getDevice().output(80, 10000);

Whats next?

Well i’m quite addicted to this new device, my Lego EV3 robot might be justified in feeling a little left out, but fear not, i’ll find a way to combine them i’m sure! Next up for the LittleBits Connector is subscribing to output from the device back to Salesforce, possibly calling out to a headless Flow, to keep that clicks not code feel going!

Finally we’ve taken a few more detailed pics in this gallery showing the construction of our pointing device. It can be a bit fiddly getting it to point consistently, but i’ll let you figure that out as its part of the fun!

“gallery here”


Creating, Assigning and Checking Custom Permissions

$
0
0

I have been wanting to explore Custom Permissions for a little while now, since they are now GA in Winter’15 i thought its about time i got stuck in. Profiles, Permission Sets have until recently, been focusing on granting permissions to entities only known to the platform, such as objects, fields, Apex classes and Visualforce pages. In most cases these platform entities map to a specific feature in your application you want to provide permission to access.

However there are cases where this is not always that simple. For example consider a Visualforce page you that controls a given process in your application, it has three buttons on it Run, Clear History and Reset. You can control access to the page itself, but how do you control access to the three buttons? What you need is to be able to teach Permission Sets and Profiles about your application functionality, enter Custom Permissions!

CustomPermissions
CustomPermission

NOTE: That you can also define dependencies between your Custom Permissions, for example Clear History and Reset permissions might be dependent on a Manage Important Process  custom permission in your package.

Once these have been created, you can reference them in your packaged Permission Sets and since they are packaged themselves, they can also be referenced by admins managing your application in a subscriber org.

SetCustomPermissions

The next step is to make your code react to these custom permissions being assigned or not.

New Global Variable $Permission

You can use the $Permission from a Visualforce page or as SFDCWizard points out here from Validation Rules! Here is the Visualforce page example given by Salesforce in their documentation.

<apex:pageBlock rendered="{!$Permission.canSeeExecutiveData}">
   <!-- Executive Data Here -->
</apex:pageBlock>

Referencing Custom Permissions from Apex

In the case of object and field level permissions, the Apex Describe API can be used to determine if an object or field is available and for what purpose, read or edit for example. This is not going help us here, as custom permissions are not related to any specific object or field. The solution is to leverage the Permission Set Object API to query the SetupEntityAccess and CustomPermission records for Permission Sets or Profiles that are assigned to the current user.

The following SOQL snippets are from the CustomPermissionsReader class i created to help with reading Custom Permissions in Apex (more on this later). As you can see you need to run two SOQL statements to get what you need. The first to get the Id’s the second to query if the user actually has been assigned a Permission Set with them in.


List<CustomPermission> customPermissions =
    [SELECT Id, DeveloperName
       FROM CustomPermission
       WHERE NamespacePrefix = :namespacePrefix];

List<SetupEntityAccess> setupEntities =
    [SELECT SetupEntityId
       FROM SetupEntityAccess
       WHERE SetupEntityId in :customPermissionNamesById.keySet() AND
             ParentId IN (SELECT PermissionSetId
                FROM PermissionSetAssignment
                WHERE AssigneeId = :UserInfo.getUserId())];

Now personally i don’t find this approach that appealing for general use, firstly the Permission Set object relationships are quite hard to get your head around and secondly we get charged by the platform to determine security through the SOQL governor. As a good member of the Salesforce community I of course turned my dislike into an Idea “Native Apex support for Custom Permissions” and posted it here to recommend Salesforce include a native class for reading these, similar to Custom Labels for example.

Introducing CustomPermissionReader

In the meantime I have set about creating an Apex class to help make querying and using Custom Permissions easier. Such a class might one day be replaced if my Idea becomes a reality or maybe its internal implementation just gets improved. One things for sure, i’d much rather use it for now than seed implicit SOQL’s throughout a code base!

Its pretty straight forward to use, construct it in one of two ways, depending if you want all non-namespaced Custom Permissions or if your developing a AppExchange package, give it any one of your packaged Custom Objects and it will ensure that it only ever reads the Custom Permissions associated with your package.

You can download the code and test for CustomPermissionsReader here.


// Default constructor scope is all Custom Permissions in the default namespace
CustomPermissionsReader cpr = new CustomPermissionsReader();
Boolean hasPermissionForReset = cpr.hasPermission('Reset');

// Alternative constructor scope is Custom Permissions that share the
//   same namespace as the custom object
CustomPermissionsReader cpr = new CustomPermissionsReader(MyPackagedObject.SObjectType);
Boolean hasPermissionForReset = cpr.hasPermission('Reset');

Like any use of SOQL we must think in a bulkified way, indeed its likely that for average to complex peaces of functionality you may want to check at least two or more custom permissions once you get started with them. As such its not really good practice to make single queries in each case.

For this reason the CustomPermissionsReader was written to load all applicable Custom Permissions and act as kind of cache. In the next example you’ll see how i’ve leveraged the Application class concept from the Apex Enterprise Patterns conventions to make it a singleton for the duration of the Apex execution context.

Here is an example of an Apex test that creates a PermissionSet, adds the Custom Permission and assigns it to the running user to confirm the Custom Permission was granted.

	@IsTest
	private static void testCustomPermissionAssigned() {

		// Create PermissionSet with Custom Permission and assign to test user
		PermissionSet ps = new PermissionSet();
		ps.Name = 'Test';
		ps.Label = 'Test';
		insert ps;
		SetupEntityAccess sea = new SetupEntityAccess();
		sea.ParentId = ps.Id;
		sea.SetupEntityId = [select Id from CustomPermission where DeveloperName = 'Reset'][0].Id;
		insert sea;
		PermissionSetAssignment psa = new PermissionSetAssignment();
		psa.AssigneeId = UserInfo.getUserId();
		psa.PermissionSetId = ps.Id;
		insert psa;

		// Create reader
		CustomPermissionsReader cpr = new CustomPermissionsReader();

		// Assert the CustomPermissionsReader confirms custom permission assigned
		System.assertEquals(true, cpr.hasPermission('Reset'));
	}

Seperation of Concerns and Custom Permissions

Those of you familiar with using Apex Enterprise Patterns might be wondering where checking Custom Permission fits in terms of separation of concerns and the layers the patterns promote.

The answer is at the very least in or below the Service Layer, enforcing any kind of security is the responsibility of the Service layer and callers of it are within their rights to assume it is checked. Especially if you have chosen to expose your Service layer as your application API.

This doesn’t mean however you cannot improve your user experience by using it from within Apex Controllers,  Visualforce pages or @RemoteAction methods to control the visibility of related UI components, no point in teasing the end user!

Integrating CustomerPermissionsReader into your Application class

The following code uses the Application class concept i introduced last year and at Dreamforce 2014, which is a single place to access your application scope concepts, such as factories for selectors, domain and service class implementations (it also has a big role to play when mocking).

public class Application {

	/**
	 * Expoeses typed representation of the Applications Custom Permissions
	 **/
	public static final PermissionsFactory Permissions = new PermissionsFactory();

	/**
	 * Class provides a typed representation of an Applications Custom Permissions
	 **/
	public class PermissionsFactory extends CustomPermissionsReader
	{
		public Boolean Reset { get { return hasPermission('Reset'); } }
	}
}

This approach ensures their is only one instance of the CustomPermissionsReader per Apex Execution context and also through the properties it exposes gives a compiler checked way of referencing the Custom Permissions, making it easier for application developers code to access them.

if(Application.Permissions.Reset)
{
  // Do something to do with Reset...
}

Finally, as a future possibility, this approach gives a nice injection point for mocking the status of Custom Permissions in your Apex Unit tests, rather than having to go through the trouble of setting up a Permission Set and assigning it in your test code every time as shown above.

Call to Action: Ideas to Upvote

While writing this blog I created one Idea and came across a two others, i’d like to call you the reader to action on! Please take a look and of course only if you agree its a good one, give it the benefit of your much needed up vote!


Controlling Internet Devices via Lightning Process Builder

$
0
0

Lightning Process Builder will soon become GA once the Spring’15 rollout completes in early February, just a few short weeks away as i write this. I don’t actually know where to start in terms of how huge and significant this new platform feature is! In my recent blog Salesforce evolves customization to a new level! over on the FinancialForce blog, i describe Salesforce as ‘the most powerful and productive cloud platform on the planet’. The more and more i get into Process Builder and how as a developer i can empower users of it, that statement is already starting to sound like an understatement!

There are many things getting me excited (as usual) about Salesforce these days, in addition to Process Builder and Invocable Actions (more on this later), its the Internet of Things. I just love the notion of inspecting and controlling devices no matter where i am on the planet. If you’ve been following my blog from earlier this year, you’ll hopefully have seen my exploits with the LittleBits cloud enabled devices and the Salesforce LittleBits Connector.

pointingdeviceI have just spent a very enjoyable Saturday morning in my Spring’15 Preview org with a special build of the LittleBits Connector. That leverages the ability for Process Builder to callout to specially annotated Apex code that in turn calls out to the LittleBits Cloud API.

The result, a fully declarative way to connect to LittleBits devices from Process Builder! If you watch the demo from my past blog you’ll see my Opportunity Probability Pointer in action, the following implements the same process but using only Process Builder!

LittleBitsProcessBuilder

Once Spring’15 has completely rolled out i’ll release an update to the Salesforce LittleBits Connector managed package that supports Process Builder, so you can try the above out. In the meantime if have a Spring’15 Preview Org you can deploy direct from GitHub and try it out now!

How can developers enhance Process Builder?

There are some excellent out of the box actions from which Process Builder or Flow Designer users can choose from, as i have covered in past blogs. What is really exciting is how developers can effectively extend these actions.

So while Salesforce has yet to provide a declarative means to make Web API callouts without code. A developer needs to provide a bit of Apex code to make the above work. Salesforce have made it insanely easy to expose code to tools like Process Builder and also Visual Flow. Such tools dynamically inspects Apex code in the org (including that from AppExchange packages) and renders a user interface for the Process Builder user to provide the necessary inputs (and map outputs if defined). All the developer has to do is use some Apex annotations.

global with sharing class LittleBitsActionSendToDevice {

	global class SendParameters {
		@InvocableVariable
		global String AccessToken;
		@InvocableVariable
        global String DeviceId;
		@InvocableVariable
        global Decimal Percent;
		@InvocableVariable
        global Integer DurationMs;
	}
	
    /**
     * Send percentages and durations to LittleBits cloud enabled devices
     **/
    @InvocableMethod(
    	Label='Send to LittleBits Device' 
    	Description='Sends the given percentage for the given duration to a LittleBits Cloud Device.')
    global static void send(List&amp;lt;SendParameters&amp;gt; sendParameters) {
    	System.enqueueJob(new SendAsync(sendParameters));
	}	
}

I learn’t quite a lot about writing Invocable Actions today and will be following up with some guidelines and thoughts on how i have integrated them with Apex Enterprise Patterns Service Layer.


Declarative Lookup Rollup Summaries – Spring’15 Release

$
0
0

This tool has had a steady number of releases last year, containing a few bug fixes and tweaks. This Spring’15 release contains a few enhancements i’d like to talk about in more detail in this blog. So lets get started with the list…

  • Support for Count Distinct rollups
  • Support for Picklist / Text based rollups via Concatenate and Concatenate Distinct operations
  • Support for Rolling up First or Last child records ordered by fields on the child such as Created by Date
  • Support for Lightning Process Builder

UPGRADE NOTE: The Lookup Rollup Summaries object has some new fields and pick list values to support the above features. If you are upgrading you will need to add these fields and pick list values manually. I have listed these in the README.

NewRollup

The following sections go into more details on each of the features highlighted above.

Support for Count Distinct rollups

If you want to exclude duplicate values from the Field to Aggregate on the child object select the Count Distinct option. For example if your counting Car__c child records by Colour__c and it has 4 records, Red, Green, Blue, Red, the count would result in 3 being stored in the Aggregate Result Field. You can read more about the original idea here.

Support for Picklist / Text based rollups

TextRollupThe rollup operations Sum, Min, Max, Avg, Count and Count Distinct operations are still restricted to rolling up number and date/time fields as per the previous releases of the tool.

However this version of the tool now supports new operations Concatenate and Concatenate Distinct that support text based fields. Allowing you to effectively concatenate field values on children into a multi-picklist or text field on the parent object record.

By default children are concatenated based on ascending order of the values in the Field to Aggregate field. However you can also use the Field to Order By field to specify an alternative child field to order by. You can define a delimiter via the Concatenate Delimiter field. You can also enter BR() in this field to add new lines between the values or a semi-colon ; character to support multi-picklist fields. You can read more about the original idea here.

Support for Rolling up First or Last child records

RollupFirstBy using the new First and Last operations you can choose to store the first or last record of the associated child records in the parent field. As with the concatenate feature above, the Field to Aggregate is used to order the child records in ascending order. However the Field to Order By field can also be used to order by an alternative field. Original idea here.

Support for Lightning Process Builder

To date the tool requires a small Apex Trigger to be deployed via the Manage Child Trigger button. With added support for Lightning Process Builder actions. This allows rollup calculations to be performed when creating or updating child object records. Sadly for the moment Process Builder does not support record deletion, so if your rollups require calculation on create, update and delete, please stick to the traditional approach.

ProcessBuilderModeTo use the feature ensure you have selected Process Builder from the Calculation Mode field and specified a unique name for the rollup definition in the Lookup Rollup Summary Unique Name. RollupUniqueName

Once this is configured your ready to add an Action in the Process Builder to execute the rollup. The following Process shows an example configuration.

ProcessBuilder1

ProcessBuilder2

As you’ve seen from some of my more recent blogs, i’m getting quite excited about Process Builder. However i have to say on further inspection, its got a few limits that really stop it for now being really super powerful! Having support for handling deletion of records and also some details in terms of how optimal it invokes the actions prevent me from recommending this feature in production. Please give me your thoughts on how else you think it could be used.


Extending Lightning Process Builder and Visual Workflow with Apex

$
0
0

MyProcessBuilderI love empowering as many people to experience the power of Salesforce’s hugely customisable and extensible platform as possible. In fact this platform has taught me that creating a great solution is not just about designing how we think a solution would be used, but also about empowering how others subsequently use it in conjunction with the platform, to create totally new use cases we never dream off! If your not thinking about how what your building sits “within” the platform your not fully embracing the true power of the platform.

So what is the next great platform feature and what has it go to do with writing Apex code? Well for me its actually two features, one has been around for a while, Visual Workflow, the other is new and shiny and is thus getting more attention, Lightning Process Builder. However as we will see in this blog there is a single way in which you can expose your finally crafted Apex functionality to users of both tools. Both of them have their merits and in fact can be used together for a super charged clicks not code experience!

IMPORTANT NOTE: Regardless if your developing building a solution in a Sandbox or as part of packaged AppExchange solution, you really need to understand this!

What is the difference between Visual Workflow and Lightning Process Builder?

At first sight these two tools look to achieve similar goals, letting the user turn a business process into steps to be executed one after another applying conditional logic and branching as needed.

One of the biggest challenges i see with the power these tools bring is educating users on use cases they can apply. While technically exposing Apex code to them is no different, its important to know some of the differences between how they are used when talking to people about how to best leverage them with your extensions.

  • UI based Processes. Here the big difference is that mainly, where Visual Workflow is concerned its about building user interfaces that allow users to progress through your steps through a wizard style UI, created by the platform for you based on the steps you’ve defined. Such UI’s can be started when the end user clicks on a tab, button or link to start the Visual Workflow (see my other blogs).
    VisualFlowUI
  • Record based Processes. In contrast Process Builder is about steps you define that happen behind the scenes when users are manipulating records such as Accounts, Opportunities an in fact any Standard or Custom object you choose. This also includes users of Salesforce1 Mobile and Salesforce API’s. As such Process Builder actually has more of an overlap with the capabilities of classic Workflow Rules.
    ProcessBuilderActions
  • Complexity. Process Builder is more simplistic compared to Flow, that’s not to say Flow is harder to use, its just got more features historically, for variables, branching and looping over information.
  • Similarities. In terms of the type steps you can perform within each there are some overlaps and some obvious differences, for example there are no UI related steps in Process Builder, yet both do have some support for steps that can be used to create or update records. They can both call out to Apex code, more on this later…
  • Power up with both! If you look closely at the screenshot above, you’ll see that Flows, short for Visual Workflow, can be selected as an Action Type within Process Builder! In this case your Flow cannot contain any visual steps, only logic steps, since Process Builder is not a UI tool. Such Flows are known as Autolaunched Flows (previously known as ‘Headless Flows’), you can read more here. This capability allows you to model more complex business processes in Process Builder.

You can read more details on further differences here from Salesforce.

What parts of your code should you expose?

Both tools have the ability to integrate at a record level with your existing custom objects, thus any logic you’ve placed in Apex Triggers, Validation Rules etc is also applied. So as you read this, your already extending these tools! However such logic is of course related to changes in your solutions record data. What about other logic?

  • Custom Buttons, Visualforce Buttons, If you’ve developed a Custom Button or Visualforce page with Apex logic behind it you may want to consider if that functionality might also benefit from being available through these tools. Allowing automation and/or alternative UI’s to be build without the need to involve a custom Visualforce or Apex development or changes to your based solution.
  • Share Calculations and Sub-Process Logic, You may have historically written a single peace of Apex code that orchestrates in a fixed a larger process via a series of calculations in a certain order and/or chains together other Apex sub-processes together. Consider if by exposing this code in a more granular way, would give users more flexibility in using your solution in different use cases. Normally this might require your code to respond to a new configuration you build in. For example where they wish to determine the order your Apex code is called, if parts should be omitted or even apply the logic to record changes on their own Custom Objects.

Design considerations for Invocable Methods

Now that we understand a bit more about the tools and the parts of your solution you might want to consider exposing, lets consider some common design considerations in doing so. The key to exposing Apex code to these tools is leveraging a new Spring’15 feature known as Invocable Methods. Here is an example i wrote recently…

global with sharing class RollupActionCalculate
{
	/**
	 * Describes a specific rollup to process
	 **/
	global class RollupToCalculate {

		@InvocableVariable(label='Parent Record Id' required=true)
		global Id ParentId;

		@InvocableVariable(label='Rollup Summary Unique Name' required=true)
		global String RollupSummaryUniqueName;

		private RollupService.RollupToCalculate toServiceRollupToCalculate() {
			RollupService.RollupToCalculate rollupToCalculate = new RollupService.RollupToCalculate();
			rollupToCalculate.parentId = parentId;
			rollupToCalculate.rollupSummaryUniqueName = rollupSummaryUniqueName;
			return rollupToCalculate;
		}
	}

	@InvocableMethod(
		label='Calculates a rollup'
		description='Provide the Id of the parent record and the unique name of the rollup to calculate, you specificy the same Id multiple times to invoke multiple rollups')
	global static void calculate(List<RollupToCalculate> rollupsToCalculate) {

		List<RollupService.RollupToCalculate> rollupsToCalc = new List<RollupService.RollupToCalculate>();
		for(RollupToCalculate rollupToCalc : rollupsToCalculate)
			rollupsToCalc.add(rollupToCalc.toServiceRollupToCalculate());

		RollupService.rollup(rollupsToCalc);
	}
}

NOTE: The use of global is only important if you plan to expose the action from an AppExchange package, if your developing a solution in a Sandbox for deployment to Production, you can use public.

As those of you following my blog may have already seen, i’ve been busy enabling my LittleBits Connector and Declarative Lookup Rollup Summary packages for these tools. In doing so, i’ve arrived at the following design considerations when thinking about exposing code via Invocable Methods.

  1. Design for admins not developers. Methods appear as ‘actions’ or ‘elements’ in the tools. Work with a few admins/consultants you know to sense check what your exposing make sense to them, a method name or purpose from a developers perspective might not make as much sense to an admin.

  2. Don’t go crazy with the annotations! Salesforce has made it really easily to expose an Apex method via simple Apex annotations such as @InvocableMethod and @InvocableVariable. Just because its that easy doesn’t mean you don’t have to think carefully about where you apply them. I view Invocable Methods as part of your solutions API, and treat them as such, in terms of separation of concerns and best practices. So i would not apply them to methods on controller classes or even service classes, instead i would apply them to dedicate class that delegates to my service or business layer classes.

  3. Apex class, parameter and member names matter. As with my thoughts on API best practices, establish a naming convention and use of common terms when naming these. Salesforce provides a REST API for describing and invoking Invocable Methods over HTTP, the names you use define that API. Currently both tools show the Apex class name and not the label, so i would derive some kind of way to group like actions together, i’ve chosen to follow the pattern [Feature]Action[ActionName], e.g. LittleBitsActonSendToDevice, so all actions for a given feature in your application at least group together.

  4. Use the ‘label’ and ‘description’ annotation attributes. Both the @InvocableMethod and @InvocableVariable annotations support these, the tools will show your label instead of your Apex variable name in the UI. The Process Builder tool currently as far as i can see does not presently use the parameter description sadly (though Visual Workflow does) and neither tool the method description. Though i would recommend you define both in case in future releases that start to use it.
    • NOTE: As this text is end user facing, you may want to run it past a technical author or others to look for typos, spelling etc. Currently, there does not appear to be a way to translate these via Translation Workbench.

  5. Use the ‘required’ attribute. When a user adds your Invocable Method to a Process or Flow, it automatically adds prompts in the UI for parameters marked as required.
    	global class SendParameters {
    		@InvocableVariable(
                       Label='Access Token'
                       Description='Optional, if set via Custom Setting'
                       Required=False)
    		global String AccessToken;
    		@InvocableVariable(
                      Label='Device Id' Description='Optional, if set via Custom Setting'
                      Required=False)
            global String DeviceId;
    		@InvocableVariable(
                       Label='Percent'
                       Description='Percent of voltage sent to device'
                       Required=True)
            global Decimal Percent;
    		@InvocableVariable(
                       Label='Duration in Milliseconds'
                       Description='Duration of voltage sent to device'
                       Required=True)
            global Integer DurationMs;
    	}
    
        /**
         * Send percentages and durations to LittleBits cloud enabled devices
         **/
        @InvocableMethod(Label='Send to LittleBits Device' Description='Sends the given percentage for the given duration to a LittleBits Cloud Device.')
        global static void send(List<SendParameters> sendParameters) {
        	System.enqueueJob(new SendAsync(sendParameters));
    	}
    

    Visual Workflow Example
    FlowParams

    Lightning Process Builder Example
    ProcessBuilderParams

  6. Bulkification matters, really it does! Play close attention to the restrictions around your method signature when applying these annotations, as described in Invocable Method Considerations and Invocable Variables Considerations. One of the restrictions that made me smile was the insistence on the compiler requiring parameters be list based! If you recall this is also one of my design guidelines for the Apex Enterprise Patterns Service layer. Basically because it forces the developer to think about the bulk nature of the platform. Salesforce have thankfully enforced this, to ensure that when either of these tools call your method with multiple parameters in bulk record scenarios your strongly reminded to ensure your code behaves itself! Of course if your delegating to your Service layer, as i am doing in the examples above, this should be a fairly painless affair to marshall the parameters across.
    • NOTE: While you should of course write your Apex tests to pass bulk test data and thus test your bulkification code. You can also cause Process Builder and Visual Workflow to call your method with multiple parameters by either using List View bulk edits, Salesforce API or Anonymous Apex to perform a bulk DML operation on the applicable object.

  7. Separation of Concerns and Apex Enterprise Patterns. As you can see in the examples above, i’m treating Invocable Actions as just another caller of the Service layer (described as part of the Apex Enterprise Patterns series). With its own concerns and requirements.
    • For example the design of the Service method signatures is limited only by the native Apex language itself, so can be quite expressive. Where as Invocable Actions have a much more restricted capability in terms of how they define themselves, we want to keep these two concerns separate.
    • You’ll also see in my LittleBits action example above, i’m delegating to the Service layer only after wrapping it in an Async context, since Process Builder calls the Invocable Method in the Trigger context. Remember the Service layer is ‘caller agnostic’, thus its not its responsibility to implement Aysnc on the callers behalf.
    • I have also taken to encapsulating the parameters and marshalling of these into the Service types as needed, thus allowing the Service layer and Invocable Method to evolve independently if needed.
    • Finally as with any caller of the Service layer i would expect only one invocation and to create a compound Service (see Service best practices) if more was needed, as apposed to calling multiple Services from the one Invocable Method.

  8. Do I need to expose a custom Apex or REST API as well? So you might be wondering that since we now have a way to call Apex code declaratively and in fact via the Standard Salesforce REST API (see Carolina’s exploits here). Would you ever still consider exposing a formal Apex or REST API (as described here)? Well here are some of my current thoughts on this, things are still evolving so i stress these are still my current thoughts…
    • The platform provides as REST API generated from you Invocable Method annotations, so aesthetically and functionally may look different from what you might consider a true RESTful API, in addition will fall under a different URL path to those you defined via the explicit Apex REST annotations.
    • If your data structures of your API are such that they don’t fall within those defined by Invocable Methods (such as Apex types referencing other Apex types, use of Maps, Enums etc..) then you’ll have to expose the Service anyway as an Apex API.
    • If your parameters and data structures are no more complex then those required for an Invocable Method, and thus would be identical to those of the Apex Service you might consider using the same class. However keep in mind you can only have one Invocable Method per class, and Apex Services typically have many methods related to the feature or service itself. Also while the data structure may match today, new functional requirements may stress this in the future, causing you to reinstate a Service layer, or worse, bend the parameters of your Invocable Methods.
    • In short my current recommendation is to continue to create a full expressive Service driven API for your solutions and treat Invocable Methods as another API variant.


Hopefully this has given you some useful things to think about when planning your own use of Invocable Methods in the future. As this is a very new area of the platform, i’m sure the above will evolve further over time as well.


Unit Testing, Apex Enterprise Patterns and ApexMocks – Part 1

$
0
0

If you attended my Advanced Apex Enterprise Patterns session at Dreamforce 2014 you’ll have heard me highlight the different between Apex tests that are either written as true unit test vs those written in a way that more resembles an integration test. As Paul Hardaker (ApexMocks author) once pointed out to me, technically the reality is Apex developers often only end up writing only integration tests.

Lets review Wikipedia’s definition of unit tests

Intuitively, one can view a unit as the smallest testable part of an application. In procedural programming, a unit could be an entire module, but it is more commonly an individual function or procedure. In object-oriented programming, a unit is often an entire interface, such as a class, but could be an individual method. Unit tests are short code fragments created by programmers or occasionally by white box testers during the development process

Does this describe an Apex Test you have written recently?

Lets review what Apex tests typically require us to perform…

  • Setup of application data for every test method
  • Executes the more code than we care about testing at the time
  • Tests often not very varied enough, as they can take a long time to run!

Does the following Wikipedia snippet describing integration tests more accurately describe this?

Integration testing (sometimes called integration and testing, abbreviated I&T) is the phase in software testing in which individual software modules are combined and tested as a group. It occurs after unit testing and before validation testing. Integration testing takes as its input modules that have been unit tested, groups them in larger aggregates, applies tests defined in an integration test plan to those aggregates, and delivers as its output the integrated system ready for system testing

The challenge with writing true unit tests in Apex can also leave those wishing to follow practices like TDD struggling due to the lack of dependency injection and mocking support in the Apex runtime. We start to desire mocking support such as what we find for example in Java’s Mockito (the inspiration behind ApexMocks).

The lines between unit vs integration testing and which we should use and when can get blurred since Force.com does need Apex tests to invoke Apex Triggers for coverage (requiring actual test integration with the database) and if your using Workflows a lot you may want the behaviour of these reflected in your tests. So one cannot completely move away from writing integration tests of course. But is there a better way for us to regain some of the benefits other platforms enjoy in this area for the times we feel it would benefit us?

Problems writing Unit Tests for complex code bases…

Integration TestingThe problem is a true unit tests aim to test a small unit of the code, typically a specific method. However if this method ends up querying the database we need to have inserted those records prior to calling the method and then assert the records afterwards. If your familiar with Apex Enterprise Patterns, you’ll recognise the following separation of concerns in this diagram which shows clearly what code might be executed in a controller test for example.

For complex applications this approach per test can be come quite an overhead before you even get to call your controller method and assert the results! Lets face it, as we have to wait longer and longer for such tests, this inhibits our desire to write further more complex tests that may more thoroughly test the code with different data combinations and use cases.


What if we could emulate the database layer somehow?

Well those of you familiar with Apex Enterprise Patterns will know its big on separation of concerns. Thus aspects such as querying the database and updating it are encapsulated away in so called Selectors and the Unit Of Work. Just prior to Dreamforce 2014, the patterns introduced the Application class, this provides a single application wide means to access the Service, Domain, Selector and Unit Of Work implementations as apposed to directly instantiating them.

If you’ve been reading my book, you’ll know that this also provides access to new Object Orientated Programming possibilities, such as polymorphism between the Service layer and Domain layer, allowing for a functional frameworks and greater reuse to be constructed within the code base.

In this two part blog series, we are focusing on the role of the Application class and its setMock methods. These methods, modelled after the platforms Test.setMock method (for mocking HTTP comms), provide a means to mock the core architectural layers of an application which is based on the Apex Enterprise Patterns. By allowing mocking in these areas, we can see that we can write unit tests that focus only on the behaviour of the controller, service or domain class we are testing.

Unit Testing

Preparing your Service, Domain and Selector classes for mocking

As described in my Dreamforce 2014 presentation, Apex Interfaces are key to implementing mocking. You must define these in order to allow the mocking framework to substitute dynamically different implementations. The patterns library also provides base interfaces that reflect the base class methods for the Selector and Domain layers. The sample application contains a full example of these interfaces and how they are applied.


// Service layer interface

public interface IOpportunitiesService
{
	void applyDiscounts(Set<ID> opportunityIds, Decimal discountPercentage);

	Set<Id> createInvoices(Set<ID> opportunityIds, Decimal discountPercentage);

	Id submitInvoicingJob();
}

// Domain layer interface

public interface IOpportunities extends fflib_ISObjectDomain
{
	void applyDiscount(Decimal discountPercentage, fflib_ISObjectUnitOfWork uow);
}

// Selector layer interface

public interface IOpportunitiesSelector extends fflib_ISObjectSelector
{
	List<Opportunity> selectByIdWithProducts(Set<ID> idSet);
}

First up apply the Domain class interfaces as follows…


// Implementing Domain layer interface

public class Opportunities extends fflib_SObjectDomain
	implements IOpportunities {

	// Rest of the class
}

Next is the Service class, since the service layer remains stateless and global, i prefer to retain the static method style. Since you cannot apply interfaces to static methods, i use the following convention, though I’ve seen others with inner classes. First create a new class something like OpportunitiesServiceImpl, copy the implementation of the existing service into it and remove the static modifier from the method signatures before apply the interface. The original service class then becomes a stub for the service entry point.


// Implementing Service layer interface

public class OpportunitiesServiceImpl
	implements IOpportunitiesService
{
	public void applyDiscounts(Set<ID> opportunityIds, Decimal discountPercentage)
	{
		// Rest of the method...
	}

	public Set<Id> createInvoices(Set<ID> opportunityIds, Decimal discountPercentage)
	{
		// Rest of the method...
	}

	public Id submitInvoicingJob()
	{
		// Rest of the method...
	}
}

// Service layer stub

global with sharing class OpportunitiesService
{
	global static void applyDiscounts(Set<ID> opportunityIds, Decimal discountPercentage)
	{
		service().applyDiscounts(opportunityIds, discountPercentage);
	}

	global static Set<Id> createInvoices(Set<ID> opportunityIds, Decimal discountPercentage)
	{
		return service().createInvoices(opportunityIds, discountPercentage);
	}

	global static Id submitInvoicingJob()
	{
		return service().submitInvoicingJob();
	}	

	private static IOpportunitiesService service()
	{
		return new OpportunitiesServiceImpl();
	}
}

Finally the Selector class, like the Domain class is a simple matter of applying the interface.

public class OpportunitiesSelector extends fflib_SObjectSelector
	implements IOpportunitiesSelector
{
	// Rest of the class
}

Implementing Application.cls

Once you have defined and implemented your interfaces you need to ensure there is a means to switch at runtime the different implementations of them, between the real implementation and a the mock implementation as required within a test context. To do this a factory pattern is applied for calling logic to obtain the appropriate instance. Define the Application class as follows, using the factory classes provided in the library. Also note that the Unit Of Work is defined here in a single maintainable place.

public class Application
{
	// Configure and create the UnitOfWorkFactory for this Application
	public static final fflib_Application.UnitOfWorkFactory UnitOfWork =
		new fflib_Application.UnitOfWorkFactory(
				new List<SObjectType> {
					Invoice__c.SObjectType,
					InvoiceLine__c.SObjectType,
					Opportunity.SObjectType,
					Product2.SObjectType,
					PricebookEntry.SObjectType,
					OpportunityLineItem.SObjectType });	

	// Configure and create the ServiceFactory for this Application
	public static final fflib_Application.ServiceFactory Service =
		new fflib_Application.ServiceFactory(
			new Map<Type, Type> {
					IOpportunitiesService.class => OpportunitiesServiceImpl.class,
					IInvoicingService.class => InvoicingServiceImpl.class });

	// Configure and create the SelectorFactory for this Application
	public static final fflib_Application.SelectorFactory Selector =
		new fflib_Application.SelectorFactory(
			new Map<SObjectType, Type> {
					Opportunity.SObjectType => OpportunitiesSelector.class,
					OpportunityLineItem.SObjectType => OpportunityLineItemsSelector.class,
					PricebookEntry.SObjectType => PricebookEntriesSelector.class,
					Pricebook2.SObjectType => PricebooksSelector.class,
					Product2.SObjectType => ProductsSelector.class,
					User.sObjectType => UsersSelector.class });

	// Configure and create the DomainFactory for this Application
	public static final fflib_Application.DomainFactory Domain =
		new fflib_Application.DomainFactory(
			Application.Selector,
			new Map<SObjectType, Type> {
					Opportunity.SObjectType => Opportunities.Constructor.class,
					OpportunityLineItem.SObjectType => OpportunityLineItems.Constructor.class,
					Account.SObjectType => Accounts.Constructor.class,
					DeveloperWorkItem__c.SObjectType => DeveloperWorkItems.class });
}

Using Application.cls

If your adapting an existing code base, be sure to leverage the Application class factory methods in your application code, seek out code which is explicitly instantiating the classes of your Domain, Selector and Unit Of Work usage. Note you don’t need to worry about Service class references, since this is now just a stub entry point.

The following code shows how to wrap the Application factory methods using convenience methods that can help avoid repeated casting to the interfaces, it’s up to you if you adopt these or not, the effect is the same regardless. Though the modification the service method shown above is required.


// Service class Application factory usage

global with sharing class OpportunitiesService
{
	private static IOpportunitiesService service()
	{
		return (IOpportunitiesService) Application.Service.newInstance(IOpportunitiesService.class);
	}
}

// Domain class Application factory helper

public class Opportunities extends fflib_SObjectDomain
	implements IOpportunities
{
	public static IOpportunities newInstance(List<Opportunity> sObjectList)
	{
		return (IOpportunities) Application.Domain.newInstance(sObjectList);
	}
}

// Selector class Application factory helper

public with sharing class OpportunitiesSelector extends fflib_SObjectSelector
	implements IOpportunitiesSelector
{
	public static IOpportunitiesSelector newInstance()
	{
		return (IOpportunitiesSelector) Application.Selector.newInstance(Opportunity.SObjectType);
	}
}

With these methods in place reference them and those on the Application class as shown in the following example.

public class OpportunitiesServiceImpl
	implements IOpportunitiesService
{
	public void applyDiscounts(Set<ID> opportunityIds, Decimal discountPercentage)
	{
		// Create unit of work to capture work and commit it under one transaction
		fflib_ISObjectUnitOfWork uow = Application.UnitOfWork.newInstance();

		// Query Opportunities
		List<Opportunity> oppRecords =
			OpportunitiesSelector.newInstance().selectByIdWithProducts(opportunityIds);

		// Apply discount via Opportunties domain class behaviour
		IOpportunities opps = Opportunities.newInstance(oppRecords);
		opps.applyDiscount(discountPercentage, uow);

		// Commit updates to opportunities
		uow.commitWork();
	}
}

The Selector factory does carry some useful generic helpers, these will internally utilise the Selector classes as defined on the Application class definition above.


List<Opportunity> opps =
   (List<Opportunity>) Application.Selector.selectById(myOppIds);

List<Account> accts =
   (List<Account>) Application.Selector.selectByRelationship(opps, Account.OpportunityId);

Summary and Part Two

In this blog we’ve looked at how to defined and apply interfaces between your service, domain, selector and unit of work dependencies. Using a factory pattern through the indirection of the Application class we have implemented an injection framework within the definition of these enterprise application separation of concerns.

I’ve seen dependency injection done via constructor injection, my personal preference is to use the approach shown in this blog. My motivation for this lies with the fact that these pattern layers are well enough known throughout the application code base and the Application class supports other facilities such as polymorphic instantiation of domain classes and helper methods as shown above on the Selector factory.

In the second part of this series we will look at how to write true unit tests for your controller, service and domain classes, leveraging the amazing ApexMocks library! If in the meantime you wan to get a glimpse of what this might look like take a wonder through the Apex Enterprise Patterns sample application tests here and here.


// Provide a mock instance of a Unit of Work
Application.UnitOfWork.setMock(uowMock);

// Provide a mock instance of a Domain class
Application.Domain.setMock(domainMock);

// Provide a mock instance of a Selector class
Application.Selector.setMock(selectorMock);

// Provide a mock instance of a Service class
Application.Service.setMock(IOpportunitiesService.class, mockService);


Unit Testing, Apex Enterprise Patterns and ApexMocks – Part 2

$
0
0

In Part 1 of this blog series i introduced a new means of applying true unit testing to Apex code leveraging the Apex Enterprise Patterns. Covering the differences between true unit testing vs integration testing and how the lines can get a little blurred when writing Apex test methods.

If your following along you should be all set to start writing true unit tests against your controller, service and domain classes. Leveraging the inbuilt dependency injection framework provided by the Application class introduced in the last blog. By injecting mock implementations of service, domain, selector and unit of work classes accordingly.

What are Mock classes and why do i need them?

Depending on the type of class your unit testing you’ll need to mock different dependencies so that you don’t have to worry about the data setup of those classes while your busy putting your hard work in to testing your specific class.

Unit Testing

In object-oriented programming, mock objects are simulated objects that mimic the behavior of real objects in controlled ways. A programmer typically creates a mock object to test the behavior of some other object, in much the same way that a car designer uses a crash test dummy to simulate the dynamic behavior of a human in vehicle impacts. Wikipedia.

In this blog we are going to focus on an example unit test method for a Service, which requires that we mock the unit of work, selector and domain classes it depends on (unit tests for these classes will of course be written as well). Lets take a look first at the overall test method then break it down bit by bit. The following test method makes no SOQL queries or DML to accomplish its goal of testing the service layer method.

	@IsTest
	private static void callingServiceShouldCallSelectorApplyDiscountInDomainAndCommit()
	{
		// Create mocks
		fflib_ApexMocks mocks = new fflib_ApexMocks();
		fflib_ISObjectUnitOfWork uowMock = new fflib_SObjectMocks.SObjectUnitOfWork(mocks);
		IOpportunities domainMock = new Mocks.Opportunities(mocks);
		IOpportunitiesSelector selectorMock = new Mocks.OpportunitiesSelector(mocks);

		// Given
		mocks.startStubbing();
		List<Opportunity> testOppsList = new List<Opportunity> { 
			new Opportunity(
				Id = fflib_IDGenerator.generate(Opportunity.SObjectType),
				Name = 'Test Opportunity',
				StageName = 'Open',
				Amount = 1000,
				CloseDate = System.today()) };
		Set<Id> testOppsSet = new Map<Id, Opportunity>(testOppsList).keySet();
		mocks.when(domainMock.sObjectType()).thenReturn(Opportunity.SObjectType);
		mocks.when(selectorMock.sObjectType()).thenReturn(Opportunity.SObjectType);
		mocks.when(selectorMock.selectByIdWithProducts(testOppsSet)).thenReturn(testOppsList);
		mocks.stopStubbing();
		Decimal discountPercent = 10;
		Application.UnitOfWork.setMock(uowMock);
		Application.Domain.setMock(domainMock);
		Application.Selector.setMock(selectorMock);

		// When
		OpportunitiesService.applyDiscounts(testOppsSet, discountPercent);

		// Then
		((IOpportunitiesSelector) 
			mocks.verify(selectorMock)).selectByIdWithProducts(testOppsSet);
		((IOpportunities) 
			mocks.verify(domainMock)).applyDiscount(discountPercent, uowMock);
		((fflib_ISObjectUnitOfWork) 
			mocks.verify(uowMock, 1)).commitWork();
	}

First of all, you’ll notice the test method name is a little longer than you might be used to, also the general layout of the test splits code into Given, When and Then blocks. These conventions help add some documentation, readability and consistency to test methods, as well as helping you focus on what it is your testing and assuming to happen. The convention is one defined by Martin Fowler, you can read more about GivenWhenThen here. The test method name itself, stems from a desire to express the behaviour the test is confirming.

Generating and using Mock Classes

The Java based Mockito framework leverages the Java runtimes capability to dynamically create mock implementations. However the Apex runtime does not have any support for this. Instead ApexMocks uses source code generation to generate the mock classes it requires based on the interfaces you defined in my earlier post.

The patterns library also comes with its own mock implementation of the Unit of Work for you to use, as well as some base mock classes for your selectors and domain mocks (made know to the tool below). The following code at the top of the test method creates the necessary mock instances that will be configured and injected into the execution.

// Create mocks
fflib_ApexMocks mocks = new fflib_ApexMocks();
fflib_ISObjectUnitOfWork uowMock = new fflib_SObjectMocks.SObjectUnitOfWork(mocks);
IOpportunities domainMock = new Mocks.Opportunities(mocks);
IOpportunitiesSelector selectorMock = new Mocks.OpportunitiesSelector(mocks);

To generate the Mocks class used above use the ApexMocks Generator, you can run it via the Ant tool. The apex-mocks-generator-3.1.2.jar file can be downloaded from the ApexMocks repo here.

<?xml version="1.0" encoding="UTF-8"?>
<project name="Apex Commons Sample Application" default="generate.mocks" basedir=".">

	<target name="generate.mocks">
		<java classname="com.financialforce.apexmocks.ApexMockGenerator">
			<classpath>
				<pathelement location="${basedir}/bin/apex-mocks-generator-3.1.2.jar"/>
			</classpath>
			<arg value="${basedir}/fflib-sample-code/src/classes"/>
			<arg value="${basedir}/interfacemocks.properties"/>
			<arg value="Mocks"/>
			<arg value="${basedir}/fflib-sample-code/src/classes"/>
		</java>
	</target>

</project>

You can configure the output of the tool using a properties file (you can find more information here).

IOpportunities=Opportunities:fflib_SObjectMocks.SObjectDomain
IOpportunitiesSelector=OpportunitiesSelector:fflib_SObjectMocks.SObjectSelector
IOpportunitiesService=OpportunitiesService

The generated mock classes are contained as inner classes in the Mocks class and also implement the interfaces you define, just as the real classes do. You can choose to add the above Ant tool call into your build scripts or just simply retain the class in your org refreshing it by re-run the tool whenever your interfaces change.


</pre>
<pre>/* Generated by apex-mocks-generator version 3.1.2 */
@isTest
public class Mocks
{
	public class OpportunitiesService 
		implements IOpportunitiesService
	{
		// Mock implementations of the interface methods...
	}

	public class OpportunitiesSelector extends fflib_SObjectMocks.SObjectSelector 
		implements IOpportunitiesSelector
	{
		// Mock implementations of the interface methods...
	}

	public class Opportunities extends fflib_SObjectMocks.SObjectDomain 
		implements IOpportunities
	{
		// Mock implementations of the interface methods...
	}
}

To make it easier for those wanting to try out the sample application i have committed the generated Mocks class here, so you can review the full generated code if you wish. Though you can of course edit it, i would recommend against it as you will not be able to re-run the generator again without loosing changes.

Mocking method responses

Mock classes are dumb by default, so of course you cannot inject them into the upcoming code execution and expect them to work. You have to tell them how to respond when called. They will however record for you when their methods have been called for you to check or assert later. Using the framework you can tell a mock method what to return or exceptions to throw when the class your testing calls it.

So in effect you can teach them to emulate their real counter parts. For example when a Service method calls a Selector method it can return some in memory records as apposed to having to have them setup on the database. Or when the unit of work is used it will record method invocations as apposed to writing to the database.

Here is an example of configuring a Selector mock method to return test record data. Note that you also need to inform the Selector mock what type of SObject it relates to, this is also the case when mocking the Domain layer. Finally be sure to call startStubbing and stopStubbing between your mock configuration code. You can read much more about the ApexMocks API here, which resembles the Java Mockito API as well.

// Given
mocks.startStubbing();
List<Opportunity> testOppsList = new List<Opportunity> { 
	new Opportunity(
		Id = fflib_IDGenerator.generate(Opportunity.SObjectType),
		Name = 'Test Opportunity',
		StageName = 'Open',
		Amount = 1000,
		CloseDate = System.today()) };
Set<Id> testOppsSet = new Map<Id, Opportunity>(testOppsList).keySet();
mocks.when(domainMock.sObjectType()).thenReturn(Opportunity.SObjectType);
mocks.when(selectorMock.sObjectType()).thenReturn(Opportunity.SObjectType);
mocks.when(selectorMock.selectByIdWithProducts(testOppsSet)).thenReturn(testOppsList);
mocks.stopStubbing();

TIP: If you want to mock sub-select queries returned from a selector take a look at this.

Injecting your mock implementations

Finally before you call the method your wanting to test, ensure you have injected the mock implementations. So that the calls to the Application class factory methods will return your mock instances over the real implementations.

Application.UnitOfWork.setMock(uowMock);
Application.Domain.setMock(domainMock);
Application.Selector.setMock(selectorMock);

Testing your method and asserting the results

Calling your method to test is a straight forward as you would expect. If it returns values or modifies parameters you can assert those values. However the ApexMocks framework also allows you to add further behavioural assertions that add further confidence the code your testing is working the way it should. In this case we are wanting to assert or verify (to using mocking speak) the correct information was passed onto the domain and selector classes.

// When
OpportunitiesService.applyDiscounts(testOppsSet, discountPercent);

// Then
((IOpportunitiesSelector) 
	mocks.verify(selectorMock)).selectByIdWithProducts(testOppsSet);
((IOpportunities) 
	mocks.verify(domainMock)).applyDiscount(discountPercent, uowMock);
((fflib_ISObjectUnitOfWork) 
	mocks.verify(uowMock, 1)).commitWork();

TIP: You can verify method calls have been made and also how many times. For example checking a method is only called a specific number of times can help add some level of performance and optimisation checking into your tests.

Summary

The full API for ApecMocks is outside the scope of this blog series, and frankly Paul Hardaker and Jessie Altman have done a much better job, take a look at the full list of documentation links here. Finally keep in mind my comments at the start of this series, this is not to be seen as a total alternative to traditional Apex test method writing. Merely another option to consider when your wanting a more focused means to test specific methods in more varied ways without incurring the development and execution costs of having to setup all of your applications data in each test method.


Where to place Validation code in an Apex Trigger?

$
0
0

Quite often when i answer questions on Salesforce StackExchange they prompt me to consider future blog posts. This question has been sat on my blog list for a while and i’m finally going to tackle the ‘performing validation in the after‘ comment in this short blog post, so here goes!

Salesforce offers Apex developers two phases within an Apex Trigger, before and after. Most examples i see tend to perform validation code in the before phase of the trigger, even the Salesforce examples show this. However there can be implications with this, that is not at first that obvious. Lets look at an example, first here is my object…

Screen Shot 2015-04-19 at 09.31.05

Now the Apex Trigger doing some validation…

trigger LifeTheUniverseAndEverythingTrigger1 on LifeTheUniverseAndEverything__c
   (before insert) {

	// Make sure if there is an answer given its always 42!
	for(LifeTheUniverseAndEverything__c record : Trigger.new) {
		if(record.Answer__c!=null && record.Answer__c != 42) {
			record.Answer__c.addError('Answer is not 42!');
		}
	}
}

The following test method asserts that a valid value has been written to the database. In reality you would also have tests that assert invalid values are rejected, though the test method below will suffice for this blog.

	@IsTest
	private static void testValidSucceeds() {

		// Insert a valid answer
		LifeTheUniverseAndEverything__c
			lifeTheUniverseAndEverything = new LifeTheUniverseAndEverything__c();
		lifeTheUniverseAndEverything.Answer__c = 42;
		insert lifeTheUniverseAndEverything;

		// Is the answer still the same, surely nobody could have changed it right?
		System.assertEquals(42,
			[select Answer__c
			   from LifeTheUniverseAndEverything__c
			   where Id = :lifeTheUniverseAndEverything.Id][0].Answer__c);
	}

This all works perfectly so far!

Screen Shot 2015-04-19 at 10.46.51

What harm can a second Apex Trigger do?

Once developed Apex Triggers are either deployed into a Production org or packaged within an AppExchange package which is then installed. In the later case such Apex Triggers cannot be changed. The consideration being raised here arises if a second Apex Trigger is created on the object. There can be a few reasons for this, especially if the existing Apex Trigger is managed and cannot be modified or a developer simply chooses to add another Apex Trigger.

So what harm can a second Apex Trigger on the same object really cause? Well, like the first Apex Trigger it has the ability to change field values as well as validate them. As per the additional considerations at the bottom of the Salesforce trigger invocation documentation, Apex Triggers are not guaranteed to fire in any order. So what would happen if we add a second trigger like the one below which attempts to modify the answer to an invalid value?

trigger LifeTheUniverseAndEverythingTrigger2 on LifeTheUniverseAndEverything__c
  (before insert) {

	// I insist that the answer is actually 43!
	for(LifeTheUniverseAndEverything__c record : Trigger.new) {
		record.Answer__c = 43;
	}
}

At time of writing in my org, it appears that this new trigger (despite its name) is actually being run by the platform before my first validation trigger. Thus since the validation code gets executed after this new trigger changes the value we can see the validation is still catching it. So while thats technically not what this test method was testing, it shows for the purposes of this blog that the validation is still working, phew!

Screen Shot 2015-04-19 at 10.50.12

Apex Trigger execution order matters…

So while all seems well up until this point,  remember that we cannot guarantee that Salesforce will always run our validation trigger last. What if ours validation trigger ran first? Since we cannot determine the order of invocation of triggers, what we can do to illustrate the effects of this is simply switch the code in the two examples triggers like this so.

trigger LifeTheUniverseAndEverythingTrigger2 on LifeTheUniverseAndEverything__c
  (before insert) {

  	// Make if there is an answer given its always 42!
	for(LifeTheUniverseAndEverything__c record : Trigger.new) {
		if(record.Answer__c!=null && record.Answer__c != 42) {
			record.Answer__c.addError('Answer is not 42!');
		}
	}
}

trigger LifeTheUniverseAndEverythingTrigger1 on LifeTheUniverseAndEverything__c
  (before insert, before update) {

	// I insist that the answer is actually 43!
	for(LifeTheUniverseAndEverything__c record : Trigger.new) {
		record.Answer__c = 43;
	}
}

Having effectively emulated the platform running the two triggers in a different order, validation trigger first, then the field modify trigger second. Our test asserts are now showing the validation logic in this scenario failed to do its job and invalid data reached the database, not good!

Screen Shot 2015-04-19 at 10.53.51

So whats the solution to making my triggers bullet proof?

So what is the solution to avoiding this, well its pretty simple really, move your logic into the after phase. Even though the triggers may still fire in different orders, one thing is certain. Nothing and i mean nothing, can change in the after phase of a trigger execution, meaning you can reliably check the field values without fear of them changing later!

trigger LifeTheUniverseAndEverythingTrigger2 on LifeTheUniverseAndEverything__c
  (after insert) {

  	// Make if there is an answer given its always 42!
	for(LifeTheUniverseAndEverything__c record : Trigger.new) {
		if(record.Answer__c!=null && record.Answer__c != 42) {
			record.Answer__c.addError('Answer is not 42!');
		}
	}
}

Thus with this change in place, even though the second trigger fires afterwards and changes the values inserted by the tests, the validation still prevents records being inserted to the database, success!

Screen Shot 2015-04-19 at 10.46.51

Summary

This approach is actually referenced in a few Trigger frameworks such as Tony Scott’s ‘Trigger Pattern for Tidy, Streamlined, Bulkified Triggers‘ and the Apex Enterprise Patterns Domain pattern.

One downside here is that for error scenarios the record is executing potentially much more platform features (for workflow and other processes) before your validation eventually stops proceedings and asks for the platform to roll everything back. That said, error scenarios, once users learn your system are hopefully less frequent use cases.

So if you feel scenario described above is likely to occur (particularly if your developing a managed package where its likely subscriber developers will add triggers), you should seriously consider leveraging the after phase of triggers for validation. Note this also applies with the update and delete events in triggers.


Automating Org Setup via Process Builder and Metadata API

$
0
0

ApexPBLikeAs those of you following my blog will know i’ve been exploring Invocable Methods. Having submitted a session abstract to this years Salesforce1 World Tour London event and had it selected. I set about building out some more use cases to demonstrate them. This blog goes into more detail into one of two i had the pleasure of presenting alongside fellow Force.com MVP Simon Goodyear. Simon presented an awesome Twillio integration, allowing the sending of SMS messages from Process Builder! You can view the slide deck here.

In the end the use case I developed for the session attempts to fill a current Admin gap i came across on Ideas Exchange. The idea to provide Universal Picklists has been around a while and looks like its finally getting some attention given some encouraging comments by the Product Manager recently. Still please help further by up voting!

In the meantime, here is my part code and part declarative solution to the problem via Process Builder! Which also gives you a template for perhaps creating other Invocable Methods around the Apex Metadata API.

What problem do Universal Picklists solve?

As you’ll read on the Idea Exchange posting, often as Admins it can be time consuming to maintain picklist entries when they are effectively duplicated across several fields and objects in a large Salesforce organisation. Process Builder is designed to allow us to automate business processes and make our day to day lives easier on the platform, so why can it not help automate Admin processes under the Setup menu as well?

Custom VF Page vs Invocable Method?

Now i know i could have done this all via a dedicated Visualforce page and controller, which presents the user with a list of objects and Picklist fields to select. And then leverage the Apex Metadata API to update the fields accordingly, and maybe this might still be a good approach. Though as i said in my earlier blog, even if you do build fully custom UI’s, you really should give some thought to exposing Invocable Methods as well…

Anyway i wanted to see how well Metadata API would work when exposed as an Invocable Method and thus give Admins the power to build their own automated processes rather than depend completely on an Apex/VF developer now and in the future. Using Invocable Methods is an ideal way to get the best out of both the clicks and code worlds without having to sacrifice one over the other.

Introducing the Add Picklist Item Action Invocable Method

The method itself is pretty small as it delegates its work to an Apex job, this is because the context Process Builder executes your method in, is within a Trigger context. Thus due to the Apex Metadata API being a wrapper around SOAP API and callouts not being permitted in Triggers a job is used.

public with sharing class AddPicklistItemAction {
    
	public class Request {
		@InvocableVariable(label='Picklist Item' required=true)
		public String pickListItem;
		@InvocableVariable(label='Fully Qualified Field Name' required=true)
		public String customFieldName;
	}
    
	@InvocableMethod(
		label='Adds picklist list items to given custom fields'
		description='Will submit a request to add the given picklist items to the given custom fields')
    public static void addPickListItem(List<Request> requests) {
        // Must enqueue the work as Apex Metadata API calls our HTTP callouts
        System.enqueueJob(new DoWork(UserInfo.getSessionId(), requests));
    }
}

As per best practices i explain in the session and my previous blog, i’m using the annotations to help make the method as easy to use as possible for the Admin, ideally without to much help. The resulting UI in Process Builder looks like this (I will show the rest of the Process Builder setup in a moment).

PickListInvocableMethod

Also per best practices, the method implementation must be bulkified. Fortunately the Metadata API itself is also designed to support bulk requests. The following code determines the Custom Fields to readMetadata, bulks the pick list items to add together and calls the Metadata API updateMetadata method.

    public class DoWork implements System.Queueable, Database.AllowsCallouts {
        
        private final String sessionId;
        
        private final List<Request> requests;
        
        public DoWork(String sessionId, List<Request> requests) {
            this.sessionId = sessionId;
            this.requests = requests;
        }
        
        public void execute(System.QueueableContext ctx) {
            
            // Metadata Service
            MetadataService.MetadataPort service = new MetadataService.MetadataPort();
            service.endpoint_x = service.endpoint_x.replace('http:', 'https:'); // Workaround to Apex MD API bug in Batch
            service.SessionHeader = new MetadataService.SessionHeader_element();
            service.SessionHeader.sessionId = sessionId;

            // Custom Fields
            Map<String, List<String>> newPickListItemsByCustomField = new Map<String, List<String>>();
            for(Request request : requests) {
				List<String> pickListItems = newPickListItemsByCustomField.get(request.customFieldName);
				if(pickListItems==null)
                    newPickListItemsByCustomField.put(request.customFieldName, pickListItems = new List<String>()); 
                pickListItems.add(request.pickListItem);
            }
            
            // Read Custom Fields
            List<MetadataService.CustomField> customFields = 
                (List<MetadataService.CustomField>) service.readMetadata('CustomField', 
                    new List<String>(newPickListItemsByCustomField.keySet())).getRecords();
            
            // Add pick list values
            for(MetadataService.CustomField customField : customFields) {
                List<String> pickListItems = newPickListItemsByCustomField.get(customField.fullName);
                for(String pickListItem : pickListItems) {
                    metadataservice.PicklistValue newPicklist = new metadataservice.PicklistValue();
                    newPicklist.fullName = pickListItem;
                    newPicklist.default_x=false;
                    customField.picklist.picklistValues.add(newPicklist);	                                        
                }
            }
                
            // Update Custom Fields and process an failed saves
            List<String> errors = new List<String>();
            for(MetadataService.SaveResult saveResult : service.updateMetadata(customFields)) {
                try {
                    handleSaveResults(saveResult);
                } catch (Exception e) {
                    errors.add(saveResult.fullName + ' : ' + e.getMessage());
                }
            }
            if(errors.size()>0) 
                throw new AddPicklistItemActionException(String.join(errors, '/n'));
        }
}

Since this is happening in the background we need to think about our batch best practices here as well. How will we report errors? Currently error reporting is handled by the platform in this code sample so will appear on the Apex Jobs page under Setup, but could be routed via an email or a Chatter post perhaps.

Doing the Clicks not Code bit…

Once this method is written and deployed, its over to clicks not code to finish the work!

Here the Admin can choose how to use the method. Which actually could be via a Visual Flow UI they have built if they preferred a more wizard UI based experience. The Admin decides to create a new Custom Object who’s records will represent the Univeral Picklist values. Whenever a new record is added to this object Process Builder will respond and perform actions that invoke the above Invocable Method to add the Picklist Items to each Picklist field as desired…

PickListsAndProcessBuilder

The full Process Builder process created by the Admin is shown below, leveraging the Apex Action type to call the Invocable Method wrapping the Apex Metadata API defined above. Note that you can call multiple actions per event to be processed by Process Builder.

PickListProcessBuilderProcess

Implementation Note: Having implemented the Invocable Method as i have done, this does require multiple invocations of it per Action (resulting in a Apex job for each). Another option would have been to pass a list of Custom Fields to it, however the Process Builder UI does not yet support this use case. The alternative might be then to ask the Admin to send a comma separated list in the single Action. Though this approach does erode the ease of use and makes it harder to manage. On balance given the likely low volume of such requests i’d personally be inclined in this case to leave this one as is, but interested to see what others think on this…

Summary

I believe Invocable Methods are a great way for any developer, be they developing code in a sandbox or for a AppExchange package to provide an even greater way for their solution to not only sit on the platform, but sit within it, and extend great tools such as Process Builder and Visual Flow.

As a community, i wonder if we can start to create a library of Invocable Methods of various kinds and perhaps provide a means to package or easily deploy them to Admins. How about an Invocable Method that exposes a means to automate Layout edits? If your interested please let me know your thoughts on this! In the meantime you can see the full source code for this blog here.

Finally, the slide deck does contain a few more links and resources so be sure to check it out also!

P.S. I also had another use case to show how to develop a kind of custom formula function approach to using Invocable Methods with Process Builder, however this hit a wall with a platform issue at the time. Which I now have a workaround for, so will likely blog about this further in the future…


Be One with the Platform through Custom Metadata

$
0
0

Whats more exciting than using the Force.com platform to build great solutions? Extending it!

Custom Metadata (GA in Summer’15) came about through Salesforce’s realisation that there is a new breed of solutions being built on the platform that aim to extend its capabilities for use by admins to help them build even more complex solutions without code. Hence its original code name ‘Platform on Platform‘ (which i am still quite fond of btw).  You can read more about my thoughts on such applications A Declarative Rollup Summary Tool for Force.com Lookup Relationships and my blog on FinancialForce.com Declarative Thinking: Apps to build Apps.

Such solutions leverage Custom Objects or Custom Settings as a means to store configuration. The point here, is this is really configuration not end user data. So when it came time to migrate such configuration from a Sandbox to Production, Change Set deployments don’t see record data. Administrators then have the choice of manually re-entering configuration or using Data Loader tools, which actually does work with Custom Settings btw.

Through the proof of concept i’ve written for this blog, i’ve experienced how Custom Metadata integrates with Change Sets and pleased to say it works very well. You can read more about such use cases in Introducing custom metadata types: the app configuration engine for Force.com.

MDTChangeSet

For those building AppExchange packages that leverage other packages exposing Custom Metadata, such packages can even package configuration and avoid the need to post install scripts to inject configuration. These benefits are just the start as it happens! Salesforce has an exciting roadmap for Custom Metadata, including the ability eventually to physically extend the available Custom Field types with those expressed via Custom Metadata types. Read more in How to use custom metadata types to save years of development on app configurations.

Is Custom Metadata something i should be considering right now?

Its certainly early days for this very promising feature, depending on the complexity of your configuration information, this may still fall into the ‘one to watch‘ category. The good news is there appears to be a strong roadmap and in the meantime quite few resources (i’ll list them all at the bottom of this blog) and an active Chatter Group with Salesforce PM’s and Developers to help you out!

In order to get a better understanding of it, i’ve rolled up my sleeves and spent this weekend digging in! I decided to use the Declarative Lookup Rollup Summary open source package as a use case to perform a small proof of concept outlined in this blog and the next, to help me understand the feature better and plan what might be needed to update the rollup tool to use it. The rollup tool, as described above, has indeed received a number of queries and requests over its time for a better way to migrate its configure between Sandbox and Production. This blog and the next, contains my findings and recommendations.

Defining Custom Metadata

A Custom Metadata type or MDT for short, is a collection of Custom Field‘s that represent your desired configuration. MDT’s are in fact expressed using the existing Custom Object metadata type, much like the approach Salesforce took with Custom Settings. In this case however you inform the platform that your expressing an MDT by using the file suffix, __mdt, for example LookupRollupSummary__mdt.object. You can read more here.

The following is a cut down version of the .object file i created for my first MDT. I started by copy and pasting the existing Custom Object definition from the rollup tool into it. Then removing unsupported stuff like layouts and action overrides to get it to upload. I also converted Picklist fields to Text, as these are also not supported at present (check out the implementation guide for supported field types).

It took me only a few minutes to create my first MDT object, pretty cool! You can view the full version here.

<?xml version="1.0" encoding="UTF-8"?>
<CustomObject xmlns="http://soap.sforce.com/2006/04/metadata">
    <fields>
        <fullName>Active__c</fullName>
        <defaultValue>false</defaultValue>
        <deprecated>false</deprecated>
        <externalId>false</externalId>
        <inlineHelpText>For Realtime rollups can only be set when the Child Apex Trigger has been deployed.</inlineHelpText>
        <label>Active</label>
        <trackTrending>false</trackTrending>
        <type>Checkbox</type>
    </fields>
    <fields>
        <fullName>AggregateOperation__c</fullName>
        <deprecated>false</deprecated>
        <externalId>false</externalId>
        <inlineHelpText>Rollup operation.</inlineHelpText>
        <label>Aggregate Operation</label>
        <trackTrending>false</trackTrending>
        <type>Text</type>
        <length>32</length>
    </fields>
    <fields>
        <fullName>AggregateResultField__c</fullName>
        <deprecated>false</deprecated>
        <externalId>false</externalId>
        <inlineHelpText>API name of the field that will store the result of the rollup on the Parent Object, e.g. AnnualRevenue</inlineHelpText>
        <label>Aggregate Result Field</label>
        <length>80</length>
        <required>true</required>
        <trackTrending>false</trackTrending>
        <type>Text</type>
        <unique>false</unique>
    </fields>
    <label>Lookup Rollup Summary</label>
    <pluralLabel>Lookup Rollup Summaries</pluralLabel>
    <visibility>Public</visibility>
</CustomObject>

Unlike Custom Object’s and Custom Setting’s there is currently no UI under the Setup menu or facility under the Schema Builder to create these. Once you have defined your MDT through a .object file, you need to deploy it (within the /objects folder). You can zip it up and use Developer Workbench, as per the description in the Custom Metadata Implementation Guide, however i’ve used MavensMate as I wanted to continue editing it afterwards.MDTWorkbench

DEPLOYMENT NOTE: If your uploading the file with MavensMate (or Force.com IDE for that matter). Make sure your using the latest API version 34.0 in your editors configuration. This is important to ensure you can express the correct level of visibility for the MDT, much like Custom Settings the options are protected and public.

One you have uploaded it, much like a Custom Object, the object will appear in your orgs schema. Note that there is currently no standard UI (tabs, layouts etc) for editing MDT records (its on the roadmap though!). You have to develop your own UI using Visualforce or Lightning. Initially I took a peak through Developer Workbench at what i had got, a LookupRollupSummary__mdt object!

You can see the usual Id field, but also few other new Standard fields have been created in addition to those custom fields described in the .object file. I found that the DeveloperName and its more fully qualified version QualifiedAPIName are good ways to reference records in MDT objects. You can read more about the standard fields for MDT’s here.

NOTE: The custom fields are prefixed by cmdpoc (Custom Metadata POC) in the screenshot above as this is the namespace used when i packaged the MDT object, something i will cover in more detail in the next blog.

Writing to Custom Metadata Objects

Your MDT objects are available within Apex as an SObject, like any other Custom Object would be. However at present you cannot use DML to write to it. Instead Salesforce have provided create, update and delete operations via their SOAP Metadata API and a new generic Metadata type called CustomMetadata. This holds a name value pair list of your MDT objects field values when inserting and updating records.

MDApexMDRefI was pleased and proud to see Salesforce themselves leveraging the Apex Metadata API open source library to work around this current limitation in their own code samples. FinancialForce.com (provider of the library) even get a credit in the implementation guide! So until, the much awaited ability to update Metadata natively in Apex arrives (up vote here), Apex Metadata API will come to the rescue!
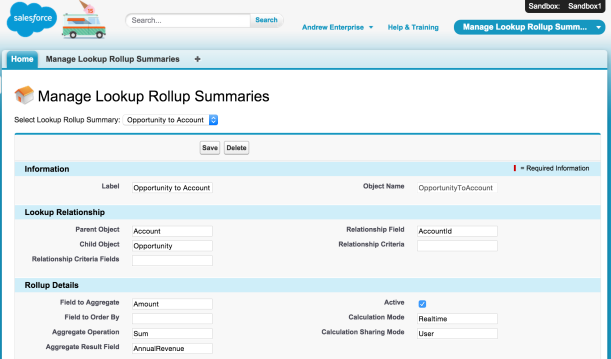
As mentioned above the generic Metadata API’s CustomMetadata type can be used to wrap configuration to be written or updated for MDT objects. Yet Salesforce have given us a wonderfully type safe SObject in Apex. Even though we cannot use DML on it, i was determined to stretch out my use of it! Thus the CustomMetadataService class was born!

The following code sample taken from a controller I developed to allow the user to edit MDT records, will insert or update a MDT record from Apex for the given MDT’s SObject’s. In the next blog I’ll go into more detail about this.

public with sharing class ManageLookupRollupSummariesController {

	public LookupRollupSummary__mdt LookupRollupSummary {get;set;}

	public PageReference save() {
		try {
			// Insert / Update the rollup custom metadata
			if(LookupRollupSummary.Id==null) {
				CustomMetadataService.createMetadata(
					new List<SObject> { LookupRollupSummary });
			}
			else {
				CustomMetadataService.updateMetadata(
					new List<SObject> { LookupRollupSummary });
			}
		} catch (Exception e) {
			ApexPages.addMessages(e);
		}
		return null;
	}
}

The CustomMetadataService class, wraps the MetadataService class, that is supplied as part of the Apex Metadata API library. As you can see from the comments at the top of the class it still needs some more work, but was enough for now for my proof of concept. My aim is to model as much around the DML methods on the Database class as possible, and hopefully aid one day a smoother transition.

I have added updateMetadata and deleteMetadata methods to this utility class as well. You can see it in action through this Visualforce Controller i wrote, more on this later though!

Reading from Custom Metadata Objects

SOQL is supported for reading records within MDT objects and works pretty much as you would expect when querying Custom Objects. Though much as Salesforce has done with reading Custom Settings (via getInstance), your MDT SOQL queries are free from the watchful eye of the governor (though the 50k row limit still applies). Thank you Salesforce!

// Listing
List<SelectOption> options = new List<SelectOption>();
options.add(new SelectOption('[new]','Create new...'));
for(LookupRollupSummary__mdt rollup :
      [select DeveloperName, Label from LookupRollupSummary__mdt order by Label])
	options.add(new SelectOption(rollup.DeveloperName,rollup.Label));

// Querying
LookupRollupSummary__mdt lookupRollupSummary =
	[select
		Id,
		Label,
		Language,
		MasterLabel,
		NamespacePrefix,
		DeveloperName,
		QualifiedApiName,
		ParentObject__c,
		RelationshipField__c,
		ChildObject__c,
		RelationshipCriteria__c,
		RelationshipCriteriaFields__c,
		FieldToAggregate__c,
		FieldToOrderBy__c,
		Active__c,
		CalculationMode__c,
		AggregateOperation__c,
		CalculationSharingMode__c,
		AggregateResultField__c,
		ConcatenateDelimiter__c,
		CalculateJobId__c,
		Description__c
	from LookupRollupSummary__mdt
	where DeveloperName = :selectedLookup];

Custom Metadata Packaging, Custom UI’s and using with Change Sets

This is already quite a large blog post, so i’m going to continue my walk through of my POC in a follow up blog. In this blog we will take a closer look at packaging MDT’s and Visualforce page and controller i built to allow users to edit the records. Finishing up with a walk through of how Change Sets where used to migrate the MDT data between my test Sandbox and Enterprise orgs. Catch you next time!

Ok…. in the meantime, have a wonder through a Gist of the full POC code.

RollupMDTUI

Other Great Custom Metadata Resources!

Here are some resources i found while doing my research, please let me know if there are others, and i’ll be happy to add them to the list!


Custom Metadata, Custom UI’s, Packaging and Change Sets

$
0
0

This is the final part of my two part blog series on Summer 15’s new Custom Metadata feature. The first blog focused on defining the Custom Metadata Type (MDT for short) and reading and writing record data with the resulting SObject, via a combination of SOQL and Apex Metadata API. In this blog I will walk through the reminder of my proof of concept experience in trying out the new Custom Metadata feature of Summer’15. Specifically focusing on building a custom UI (no native UI support yet), AppExchange packaging and finally trying it out with Change Sets!

Custom UI’s for Custom Metadata Types

As described in the previous blog native DML in Apex against MDT SObject’s is not supported as yet. So effectively making a HTTP SOAP API (Metadata API) call to update MDT records made the execution flow in the controller a little different than normal, my solution to that may not be the only one but was simple and elegant enough for my use case case. As this was a POC i really just wanted to focus on the mechanics not the aesthetics, or user experience, however in the end i’m quite pleased with all.

  • CustomMetadataCreateNewCreating Records. The user first goes to the page and they see Create new…. in the drop down and the Developer Name field is enabled, hitting Save creates the record, refreshes the page and switches to edit mode. At this stage the Developer Name field is disabled and the drop down shows the recently created record selected by default.
  • RollupMDTUIEditing Records. In this mode the Developer Name (Object Name) field is disabled and Delete is enabled, users can either hit Save, Delete or pick another record from the drop down to Edit.
  • Deleting Records. By picking an existing record from the drop down, the Delete button is enabled. Once the user clicks it the record is deleted and the page refreshes (its a POC so no second chances with confirmation prompts!), then defaults back to selecting Create new… in the drop down.


So thats a simple walkthrough of the UI done, lets look at how it was built. In keeping with my desire to leverage the fact that MDT’s result in actual SObject’s i set about using some of the standard Visualforce components, to get the labels and some field validation via components like apex:inputField initially.

Currently the platform extends the fact that the SObject record itself cannot be natively inserted, to the fields themselves, and thus they are marked in the schema as read only. Which of course apex:inputField honours and consequently displays nothing. This is a shame, as i really wanted some UI validation for free. So as you can see from the sample code below i switched to using apex:inputText, apex:inputCheckbox etc. which do in fact still help me reuse the Custom Field labels, since they are placed within an apex:pageBlockSection.

<apex:page controller="ManageLookupRollupSummariesController" showHeader="true"
		sidebar="true" action="{!init}">
	<apex:form>
		<apex:sectionHeader  title="Manage Lookup Rollup Summaries"/>
		<apex:outputLabel value="Select Lookup Rollup Summary:" />&nbsp;
		<apex:selectList value="{!SelectedLookup}" size="1">
			<apex:actionSupport event="onchange" action="{!load}" reRender="rollupDetailView"/>
			<apex:selectOptions value="{!Lookups}"/>
		</apex:selectList>
		<p/>
		<apex:pageMessages/>
		<apex:pageBlock mode="edit" id="rollupDetailView">
			<apex:pageBlockButtons>
				<apex:commandButton value="Save" action="{!save}"/>
				<apex:commandButton value="Delete" action="{!deleteX}" disabled="{!LookupRollupSummary.Id==null}"/>
			</apex:pageBlockButtons>
			<apex:pageBlockSection title="Information" columns="2">
				<apex:inputText value="{!LookupRollupSummary.Label}"/>
				<apex:inputText value="{!LookupRollupSummary.DeveloperName}" disabled="{!LookupRollupSummary.Id!=null}"/>
			</apex:pageBlockSection>
			<apex:pageBlockSection title="Lookup Relationship" columns="2">
				<apex:inputText value="{!LookupRollupSummary.ParentObject__c}"/>
				<apex:inputText value="{!LookupRollupSummary.RelationshipField__c}"/>
				<apex:inputText value="{!LookupRollupSummary.ChildObject__c}"/>
				<apex:inputText value="{!LookupRollupSummary.RelationshipCriteria__c}"/>
				<apex:inputText value="{!LookupRollupSummary.RelationshipCriteriaFields__c}"/>
			</apex:pageBlockSection>
			<!-- Cut down example, see Gist link for full code -->
		</apex:pageBlock>
	</apex:form>
</apex:page>

You will also see thats its a totally custom controller, no standard controller support currently yet either. Other than that its fairly basic affair to use Visualforce with MDT SObject’s once the custom controller exposes an instance of one, in my case via the LookupRollupSummary property. The full source code for the controller can be found here, lets walk through the code relating to each of its life cycles. Firstly page construction…

public with sharing class ManageLookupRollupSummariesController {

	public LookupRollupSummary__mdt LookupRollupSummary {get;set;}

	public String selectedLookup {get;set;}

	public ManageLookupRollupSummariesController() {
		LookupRollupSummary = new LookupRollupSummary__mdt();
	}

	public List<SelectOption> getLookups() {
		// List current rollup custom metadata configs
		List<SelectOption> options = new List<SelectOption>();
		options.add(new SelectOption('[new]','Create new...'));
		for(LookupRollupSummary__mdt rollup :
				[select DeveloperName, Label from LookupRollupSummary__mdt order by Label])
			options.add(new SelectOption(rollup.DeveloperName,rollup.Label));
		return options;
	}

	public PageReference init() {
		// URL parameter?
		selectedLookup = ApexPages.currentPage().getParameters().get('developerName');
		if(selectedLookup!=null)
		{
			LookupRollupSummary =
				[select
					Id, Label, Language, MasterLabel, NamespacePrefix, DeveloperName, QualifiedApiName,
					ParentObject__c, RelationshipField__c, ChildObject__c, RelationshipCriteria__c,
					RelationshipCriteriaFields__c, FieldToAggregate__c, FieldToOrderBy__c,
					Active__c, CalculationMode__c, AggregateOperation__c, CalculationSharingMode__c,
					AggregateResultField__c, ConcatenateDelimiter__c, CalculateJobId__c, Description__c
				from LookupRollupSummary__mdt
				where DeveloperName = :selectedLookup];
		}
		return null;
	}

Note: Here the DeveloperName is used, since when redirecting after record creation I don’t yet have the ID (more a reflection of the CustomMetadataService being incomplete at this stage) so this is a good alternative. Also note the SOQL code above is not recommended for production use, you should always use SOQL arrays and handle the scenario where the record does not exist elegantly.

In the controller constructor the MDT SObject type is constructed, as the default behaviour is to create a new record. After that the init method fires (due to the action binding on the apex:page tag), this method determines if the URL carries a reference to a specific MDT record or not, and loads it via SOQL if so. You can also see in the getLookups method SOQL being used to query the existing records and thus populate the dropdown.

As the user selects items from the dropdown, the page is refreshed via the load method with a custom URL carrying the selected record and the init method basically loads it into the LookupRollupSummary property and results in its display on the page.

	public PageReference load() {
		// Reload the page
		PageReference newPage = Page.managelookuprollupsummaries;
		newPage.setRedirect(true);
		if(selectedLookup != '[new]')
			newPage.getParameters().put('developerName', selectedLookup);
		return newPage;
	}

Finally we see the heart of the controller the save and deleteX methods.

	public PageReference save() {
		try {
			// Insert / Update the rollup custom metadata
			if(LookupRollupSummary.Id==null) {
				CustomMetadataService.createMetadata(new List<SObject> { LookupRollupSummary });
			} else {
				CustomMetadataService.updateMetadata(new List<SObject> { LookupRollupSummary });
			}
			// Reload this page (and thus the rollup list in a new request, metadata changes are not visible until this request ends)
			PageReference newPage = Page.managelookuprollupsummaries;
			newPage.setRedirect(true);
			newPage.getParameters().put('developerName', LookupRollupSummary.DeveloperName);
			return newPage;
		} catch (Exception e) {
			ApexPages.addMessages(e);
		}
		return null;
	}

	public PageReference deleteX() {
		try {
			// Delete the rollup custom metadata
			CustomMetadataService.deleteMetadata(
				LookupRollupSummary.getSObjectType(), new List<String> { LookupRollupSummary.DeveloperName });
			// Reload this page (and thus the rollup list in a new request, metadata changes are not visible until this request ends)
			PageReference newPage = Page.managelookuprollupsummaries;
			newPage.setRedirect(true);
			return newPage;
		} catch (Exception e) {
			ApexPages.addMessages(e);
		}
		return null;
	}

These methods leverage those i created on the CustomMetadataService class i introduced in my previous blog to do the bulk of the work, so in keeping with Separation of Concerns keep the controller doing what its supposed to be doing. Whats important here is that when your effectively making a HTTP outbound call to insert, update or delete the records, the the context your code is currently running in will not see the record until it has ended. Meaning you cannot simply issue a new SOQL query to refresh the drop down list controller state and have it refreshed on the page. My solution to this, and admittedly its a heavy handed one, is to return my page reference with the developerName URL parameter set and setRedirect(true) which will cause a client side redirect and thus the page initialisation to fire again in a new request which can see the insert or updated record information.

Populating MDT SObject Fields in Apex

As i mentioned above, MDT SObject fields are marked as read only, while Visualforce bindings appear to ignore this. Apex code is not immune to this, and the following code fails to save with…

Field is not writeable: LookupRollupSummary__mdt.DeveloperName
	CustomMetadataService.createMetadata(
			new List<LookupRollupSummary__mdt> {
				new LookupRollupSummary__mdt(
						DeveloperName = 'Test',
						MasterLabel = 'Test Label',
						Active__c = true,
						ChildObject__c = 'Opportunity',
						ParentObject__c = 'Account',
						RelationshipField__c = 'AccoundId')
				});

Not to be deterred from using compiler checked SObject Custom Field references i have updated the CustomMetadataService to take a map of SObjectField tokens and values, which looks like this.

		CustomMetadataService.createMetadata(
			// Custom Metadata Type
			LookupRollupSummary__mdt.SObjectType,
			// List of records
			new List<Map<SObjectField, Object>> {
					// Record
					new Map<SObjectField, Object> {
						LookupRollupSummary__mdt.DeveloperName => 'Test',
						LookupRollupSummary__mdt.MasterLabel => 'Test Label',
						LookupRollupSummary__mdt.Active__c => true,
						LookupRollupSummary__mdt.ChildObject__c => 'Opportunity',
						LookupRollupSummary__mdt.ParentObject__c => 'Account',
						LookupRollupSummary__mdt.RelationshipField__c => 'AccountId'
					}
				});

Its not ideal, but does allow you to get as much re-use out of the MDT SObject type as possible until Salesforce execute more of their roadmap and open up native read/write access to this object.

Packaging Custom Metadata Types and Records!

AddToPacakgeThis is a thankfully UI driven process, much as you would any other component. Simply go to your Package Definition and add your Custom Metadata Type, if it has not already been brought in already through your SObject type references in your Visualforce or Apex code. Once added is shown as a Custom Object in the package detail page.

MDTInPackage

You can also if you desire package any MDT records you have created as well, which is actually very cool! No longer do you have to write a post install Apex Script to populate your own default configurations (for example), you can just package them as you would any other peace of Metadata. For example here is a screenshot showing the packaging of a default rollup i created in the packaging org and it showing up on the Add to Package screen. Once installed this will be available to your packaged Apex code to query.

DefaultRollupAddToPacakge

This then shows up as a Custom Metadata Record in your Packaged Components summary!

PackagedMDTRecord

Finally note that you can have protected Custom Metadata types (much like Custom Settings), where only your packaged Apex code can read Custom Metadata records you have packaged and subscribers of your package cannot add new records, here you would want to use the aforementioned ability to package your MDT records.  The Metadata API cannot access protected MDT’s that have been installed via a managed package.

Trying out Change Sets

I created myself test Enterprise Edition and Sandbox orgs, installed my POC package in both and eagerly got started trying out Change Sets with my new Custom Metadata type! Which i admit is the first time i’ve actually used Change Sets! #ISVDeveloper.  The use case i wanted to experience here is simply as follows…

  • User defines or updates some custom configuration in Sandbox and tests it
  • User wants to promote that change to Production as simply as possible

In a world before Custom Metadata, platform on platform tools such as Declarative Lookup Rollup Summary, approached the above use case by either expecting the user to manually re-enter configuration, or doing a CSV export of configuration data, downloading to a desktop and re-upload in the Production org. This dance is simply a thing of the past in the world of Custom Metadata! Here is what i did to try this out for the first time!

  • Setup my custom metadata records via my Custom UI in the Sandbox
  • Created a Sandbox Change Set with my records in and uploaded it
    MDTChangeSet
  • Deployed my Change Set in the Enterprise org and job done!
    MDDeploy

Conclusion and Next Steps for Declarative Rollup Summary Tool?

I started this as means to get a better practical understanding of this great new platform feature for Summer’15 and i definitely feel i’ve got that. While its a little bitter sweet at present, due to its slightly raw barry to entry getting into it, it’s actually a pretty straight forward native experience once you get past the definition stage. Once Salesforce enable native UI for this area i’m sure it will take off even more! My only other wish is native Apex support for writing to them, but i totally understand the larger elephant in the corner on this one, being native Metadata API support (up vote idea here).

So do i feel i can migrate my Declarative Lookup Rollup Summary (DLRS) tool to Custom Metadata now? The answer is probably yes, but would i ditch the current Custom Object approach in doing so? Well no. I think its prudent to offer both ways of defining for now and perhaps offer the Custom Metadata approach as a pilot feature to users of this tool, leveraging an updated version of the pilot UI that already exists as a Custom UI. For sure i can see how by leveraging the tools use of Apex Enterprise Patterns and separation of concerns, i can start to weave dual mode support in without to much disruption. Its certainly not a single weekend job, but one that sounds fun, i’ll perhaps map out the tasks in a GitHub enhancement and see if my fellow contributors would like to join in!

Other Great Custom Metadata Resources!

In addition to my first blog in this series, here are some resources i found while doing my research, please let me know if there are others, and i’ll be happy to add them to the list!


Using Action Link Templates to Declaratively call API’s

$
0
0

ActionLinkSetupSalesforce recently introduced a new platform feature which has now become GA called Action Link Templates. Since then its been staring me in the face and bugging me that i didn’t quite understand them until now…

While there is quite a lot of information in the Salesforce documentation, i was still a bit lost as to what even an Action Link was. It turns out that they are a means to define actions that can appear in a Chatter Post to call external or Salesforce web based API’s. Thus allowing users to do more without leaving their feed.

After realising its a means to link user actions with API’s. I could not resist exploring further with one my favourite external API’s, from LittleBits. The LittleBits cloud API can be used with cloud connected devices constructed by snapping together modules.

The following shows a Chatter Post i created with an Action Link button on it that without any code calls the LittleBits API to cause my device to perform an action. You can read more about my past exploits with Littlebits devices and Salesforce here.

ActionLinkPrimary

It appears for now at least, that such Chatter Posts need to be programatically created and as such lend themselves to integration use cases. While it is possible to create Chatter Posts with Action Links in code without using a template, thats more coding, and doesn’t encourage reuse of Action Link definitions which can also be packaged btw. So this blog focuses, as always on the best practice of balancing the best of declarative with minimal of coding to create the post itself. So first of all lets get some terminology out of the way…

  • Action Link, can actually be rendered as a button or a menu option that appears inline in the chatter post or in the overflow menu on the post. The button can either call an API, redirect to another web site or offer to download a file for the user. You have to add a Action Link to an Action Link Group before you can add it to a Chatter post.
  • Action Link Group, is a collection of one or more Action Links. The idea is the group presents a collection of choices you want to give to the user, e.g Accept, Decline. You can define a default choice, though the user can only pick one. Think of it like a group of radio controls or a choices type UI element. As mentioned above you can create both these 100% in code if you desire.
  • Action Link Group Template, is as the name suggests similar to the above, but allows for declarative definition and then programatic application of the buttons to be separated out. Once you start defining Action Links you’ll see they require a bit of knowledge about the underlying API. So in addition to the reuse benefit, a template is a good way to have someone else or package developer do that work for you. In order to make them generic, you can define place holders in Action Links, called bindings, that allow you to vary the information passed to the underlying API being called.

To define an Action Link you need to create the Action Link Group. Because we are using a template, this can be done using point and click. Under the Setup menu, under Create, you’ll find Action Link Templates, click New.

ActionLinkGroup

The Category field allows you to determine where the Action Link appears, in the body of the feed by selecting Primary action (as shown in the screenshot above) or in the overflow menu by selecting Overflow action, as shown in the screenshot below. Note that my example only defines one Action Link, you can define more.

ActionLinkOverflow

Through the Executions Allowed field, you can also determine if the Action Link can be invoked only once (first come first served) or once by each user who can see the chatter post (for example a chatter post to a group). You can read more about these and other fields here.

Your now ready to add an Action Link to the template, first study the documentation of your chosen web API, not that it can in theory be a SOAP based API, though REST is generally simpler. Hopefully, like the LittleBits API there are some samples that you can copy and paste to get you started. The following extract is what the LittleBits API documentation has to say about the API to control (output to) a device

This outputs 10% amplitude for 10 seconds:

curl -XPOST https://api-http.littlebitscloud.cc/devices/a84hf038ierj/output 
-H ‘Authorization: Bearer TOKEN’ 
-H ‘Accept: application/vnd.littlebits.v2+json’ 
–data ‘{“percent”:10,”duration_ms”:10000}’
“OK”

REST API documentation often uses a command line program called curl as an easy way to try out the API without having to write program code. In the screenshot below you can see how the curl parameters used in the extract above have been mapped to the fields when defining an Action Link. Note also that i have used the {!Bindings.var} syntax to define variable aspects, such as the deviceId, accessToken, percent and durationMs.

ActionLinkLittleBits

NOTE: The User Visibility setting is quite flexible and allows you to control who can actually press the button, as apposed to those who can actually see the Chatter Post.

Go back to your Action Link Group Template and check the Published checkbox. This makes it available for use when creating posts, but also has the effect of making certain aspects read only, such as the bindings. Though you can thankfully continue to tweak the API header and body templates defined on the Action Links.

Execute from Developer Console the following and it will create the Chatter Post shown in above. Currently neither Process Builder or Visual Flow are yet to support Action Link Templates when creating Chatter posts, which gives me an idea for a part two to this blog actually! For now please up vote this idea and review the following code.

// Specify values for Action Link bindings
Map<String, String> bindingMap = new Map<String, String>();
bindingMap.put('deviceId', 'yourdeviceid');
bindingMap.put('accessToken', 'youraccesstoken');
bindingMap.put('percent', '50');
bindingMap.put('durationMs', '10000');
List<ConnectApi.ActionLinkTemplateBindingInput> bindingInputs = new List<ConnectApi.ActionLinkTemplateBindingInput>();
for (String key : bindingMap.keySet()) {
    ConnectApi.ActionLinkTemplateBindingInput bindingInput = new ConnectApi.ActionLinkTemplateBindingInput();
    bindingInput.key = key;
    bindingInput.value = bindingMap.get(key);
    bindingInputs.add(bindingInput);
}

// Create an Action Link Group definition based on the template and bindings
ActionLinkGroupTemplate template = [SELECT Id FROM ActionLinkGroupTemplate WHERE DeveloperName='LittleBits'];
ConnectApi.ActionLinkGroupDefinitionInput actionLinkGroupDefinitionInput = new ConnectApi.ActionLinkGroupDefinitionInput();
actionLinkGroupDefinitionInput.templateId = template.id;
actionLinkGroupDefinitionInput.templateBindings = bindingInputs;
ConnectApi.ActionLinkGroupDefinition actionLinkGroupDefinition =
    ConnectApi.ActionLinks.createActionLinkGroupDefinition(Network.getNetworkId(), actionLinkGroupDefinitionInput);
System.debug('Action Link Id is ' + actionLinkGroupDefinition.actionLinks[0].Id);

// Create the post and utilise the Action Link Group created above
ConnectApi.TextSegmentInput textSegmentInput = new ConnectApi.TextSegmentInput();
textSegmentInput.text = 'Click to Send to the Device.';
ConnectApi.FeedItemInput feedItemInput = new ConnectApi.FeedItemInput();
feedItemInput.body = new ConnectApi.MessageBodyInput();
feedItemInput.subjectId = 'me';
feedItemInput.body.messageSegments = new List<ConnectApi.MessageSegmentInput> { textSegmentInput };
feedItemInput.capabilities = new ConnectApi.FeedElementCapabilitiesInput();
feedItemInput.capabilities.associatedActions = new ConnectApi.AssociatedActionsCapabilityInput();
feedItemInput.capabilities.associatedActions.actionLinkGroupIds = new List<String> { actionLinkGroupDefinition.id };

// Post the feed item.
ConnectApi.FeedElement feedElement =
    ConnectApi.ChatterFeeds.postFeedElement(
        Network.getNetworkId(), feedItemInput, null);

If you review the debug log produced the above code will output the Action Link Id. This can be used to retrieve response information from the Web API called. This is especially useful if the Web API callout failed, as only a generic failure message is shown to the end user. Once you have the Action Link Id paste the following code into Developer Console and review the debug log for the Web API response.

ConnectApi.ActionLinkDiagnosticInfo diagInfo =
    ConnectApi.ActionLinks.getActionLinkDiagnosticInfo(
        Network.getNetworkId(), '0AnG0000000Cd3NKAS');
System.debug('Diag output ' + diagInfo.diagnosticInfo);

Summary

Its true that Chatter Actions (formally Publisher Actions) are another means to customise the user experience of Chatter Posts, however these require development of Visualforce pages or Canvas applications. However by using Action Links you can provide a simpler platform driven user experience with much less coding.

By using Action Link Group Templates you can separate the concerns of delivering an integration, between those who know the external API’s and those that are driving the integration with Chatter via chatter posts referencing them. The bindings form the contract between the two.

Its also worth noting the Apex REST API‘s can be used from Action Links as well as other Salesforce API’s, in this case the authentication is handled for you, nice!


Great Contributions to Apex Enterprise Patterns!

$
0
0

Just one week before the start of Dreamforce 2015, the Apex Enterprise Pattern library will be 2 years old since it was first published. My community time is increasingly busy these days not only answering questions around this and other GitHub repositories, but also reviewing Pull Requests. Both are a sign of a healthy open source project for sure! In this short blog i just wanted to call out some of the new features added by the community. So lets get started…

  • Unit of Work, register Method flexibility.  
    The initial implementation of Unit Of Work used a List to contain the records registered with it. This ment that in some cases if the code path registered the same record twice an error would occur. This change means you don’t have to worry about this and if complex code paths happen to register the same record again, it will be handled without error.Thanks to: Thomas Fuda for this enhancement!
  • Unit of Work, customisable DML implementation via IDML interface. 
    This improvement allows you to implement the IDML interface to implement your own calls to the platforms DML methods. The use case that prompted this enhancement was to allow for fine grained control using the Database methods that permit options such as all or nothing control (the default being all).Thanks to: David Esposito for this enhancement!
  • Unit of Work and Application Factory, new newInstance(Set<SObjectType> types) method
    This enhancement provides the ability to leverage the factory but have it provide Unit of Work instances configured using a specific set of SObjectType’s and not the default one. In cases where you have only a few objects to register, perhaps dynamically or those different from the default Application set for a specific use case. Please read the comments for this method for more details.Thanks to: John Davis for this enhancement!
  • Unit of Work, Eventing API
    New virtual methods have been added to the Unit of Work class, allowing those that want to subclass it, to hook special handling code to be executed during commitWork. This allows you to extend in very custom way your application or services own work to be done at various stages, start, end and during the DML operations. For example common validation that can only occur once everything has been written but not before the request ends.Thanks to: John Davis for this enhancement!
  • Unit of Work, Bulkified Register Methods
    Its now possible to register lists of SObject’s with the Unit of Work in one method call rather than one per call. While the Unit of Work has always been internally bulkified, this enhancement helps callers who are dealing with lists or maps interact with the Unit Of Work more easily.Thanks to: MayTheSForceBeWithYou (now a FinancialForce employee) for this enhancement!
  • Selector, Better default Order By handling
    Not all Standard objects have a Name field, this excellent enhancement helped ensure that if this was the case the base class would look for the next best thing to sequence your records against by default. Alex has also made numerous other tweaks to the Selector layer in addition to this btw!Thanks to: Alex Tennant for this enhancement!

In addition to the above there has been numerous behind the scenes improvements to library as well, making it more stable, support various non standard aspects of standard objects and such like. I based the above on GitHub’s report of commits to the repository here.

In addition to code changes, there are also some great discussions and ideas in the pipeline…

  • Unit of Work and Cyclic Dependencies
    This limitation doesn’t come up often, but for complex situations is causing fans of the UOW some pain having to leave it behind when it does. This is the long standing request by Seth Stone, but has seen a few attempts since via Alex Tennant and more recently some upcoming efforts by john-m in the pipeline. Watch this space!
  • Helper methods to fflib_SObjectDomain for Changed Fields
    Another Force.com MVP, Daniel Hoechst, suggested this feature, inspired from those present in other trigger frameworks, join the conversation here.
  • Support for undelete Trigger events to Domain layer
    This idea raised by our good friends over at BigAssForce, is seeing some recent interest for contribution by Autobat, see here for more discussion.

Thank you one and all for being social and contributing to a growing community around this library!


Exploring IoT with LittleBits and Salesforce #DF15

$
0
0

As soon as I got my hands on the LittleBits kit last December, i quickly fell in love with it. With its mission to bring IoT and electronics closer to everyone or in the words of LittleBits themselves …

OUR MISSION IS TO DEMOCRATIZE HARDWARE

It felt very familiar! Salesforce’s own Clicks not Code methodology is effectively the same but for Software!  However i quickly found some missing capabilities. While IFTTT (default way to control LittleBits) is great, there is only support for sending a Chatter Post. But no way to have Salesforce control devices or respond to them in different ways.

SNUGSSFBay1Immediately i set about to rectify this! With a mission to allow the super inventive Salesforce community to leverage the full capability of LittleBits devices, the LittleBits Connector package was born earlier this year!

Here is very cute creation from SNUGSFBAY using an early release…  “this guy’s blue light shines when Salesforce targets are met!”

Dreamforce 2015

If your attending Dreamforce, I’ll be explaining more about IoT, its background, why you need to thinking about it and how you can have some fun exploring ideas with Salesforce and LittleBits, click the link below to signup to my session!

Dreamforce Session: Building Your own Internet of Things with the LittleBits Salesforce Connector

Abstract: Devices are soon to out number humans as connected things on the internet! Are you prepared for judgement day? LittleBits is the perfect hardware complement to Salesforce’s clicks-not-code approach. No knowledge of electronics or even how to solder wires together is required. It’s all plug and play, or clicks-not-solder! There are over 40 LittleBits modules allowing projects such as automatic fish feeders, burglar alarms, or anything you can imagine. Join us to see how we’ve built the LittleBits Connector for Salesforce. Learn to connect your own Internet of Things creations to your Salesforce objects, processes, and reports using clicks-not-code via LittleBits

Latest Release of the LittleBits Connector

The latest release of the LittleBits Connector v1.12 now provides full support for integrating with LitteBits devices. Meaning you can now not only tell the device to perform an action from Salesforce, but you can also have Salesforce respond to messages (or events) the device sends. Your imagination is really the only limit! Choose from one of its many input bits, such as sound, movement and other sensors. As before this is made possible without coding at all!

Here is a sneak preview of one of my slides from my Dreamforce session above…

LittleBitsOverview

Controlling Devices with Lightning Process Builder

LittleBitsProcessIf you’ve been following my blog, you’ll have already read my earlier blog describing how to use Process Builder to control LittleBits devices. It works really well and i’ve improved the internal coding for the Process Builder Action contained in the package for this new release. If your a Salesforce user and have not heard of Process Builder, you have my permission to stop reading now and go find out about it!Number(new)_1LR

 

Controlling Devices with Salesforce Reports

Servo_4LRFellow Salesforce MVP, Cory Cowgill and I quickly found each other online as having had similar thoughts on integrating LittleBits with Salesforce. His sample code for using the Analytics API and LittleBits, inspired me to build a declarative feature in the connector.


Simply create a Salesforce Summary Report and the connector runs the report on an hourly basis and updates your chosen device! In the following example, i created a report showing Closed Won Opportunities for the period, leveraging a formula field in the report to arrive at the all important target percentage i would then pass to my device.

CloseWonGoalReport

You can then define a LittleBits Report Trigger to tell the connector about the Salesforce Report and some details of where information can be found in the report. The Test button can be used to run the report immediately, so you can check everything is working fine. Finally use the Schedule button on the List View to schedule the job to run hourly.

LittleBitsReportTrigger
LittleBitsReportTest
LittleBitsReportSchedule

I’ll be building a device to demo this facility for Dreamforce, signup to my session to see it!

Responding to Devices with Salesforce Visual Flow

IMG_8503LR IMG_8530RFLXLROnce again inspired by Cory Cowgill‘s sample here, this declarative feature allows you to connect LittleBits sensors (moving, sound, buttons etc) and any LittleBits input bit to Salesforce. Events sent to Salesforce are handled by Salesforce Visual Flow, or more specifically a Autolaunched Flows that you create. This is a very powerful #clicksnotcode tool, meaning the possibilities are practically endless in terms of what you can do in Salesforce in response to events from your latest device!

Once you have configured your org to receive device events, you can setup a LittleBits Device Subscription to start listening to specific events from your devices and routing them to your chosen Flow. You can read more about how to configure your org and these events on the wiki here.

LittleBitsDeviceSubscription

You will have to have some experience with Visual Flow, but don’t be scared its quite easy to use and i’ll walk you through some examples to get you started in my Dreamforce session! Plus there are many many great resources in the Salesforce Community to help you.

The following Flow has only one step, Record Create, that simply echo’s the information passed from the device to a custom object as a kind of device event log. However you can of course do anything you like in Flow with its many conditional and data elements at your disposal!

LittleBitsDeviceFlow
LittleBitsDeviceLogs

Summary

I’m really very excited to see what happens next in the community with this latest release. There have already been some exciting devices from my fellow MVP’s in the community, what will you build next?!!


Viewing all 119 articles
Browse latest View live